

Table of contents
- Prerequisite
- Create a New Compose Project With Material3
- Install The Relay For Android Studio Plugin
- Generate Figma Personal Token
- Add The Figma Access Token To Android Studio
- Add the Relay Gradle plugin to your project
- Install Relay for Figma Plugin On Figma
- Create a UI Package
- Import UI Packages in Android Studio
- Generate The Composable Functions
- Use The Generated Composable Function
- Update UI to Use Content Parameters
- Add a Content Parameter to Figma UI
- Update UI component in Android Studio
Droiders, gather here!
Do you ever get tired of the monotonous back-and-forth between yourself and designers when building Android UI?
If so, then you need to check out Relay!
Relay is a plugin that makes it possible to directly import Figma designs into Android Studio projects. This means that Relay will automatically generate pixel-perfect Jetpack Compose code from the UI that developers can use to build their apps.
In this article, you will import a splash screen using Relay Plugin. You will learn how to:
Install the Relay plugin in Android Studio and perform a basic setup.
Generate your Figma personal access token.
Install Relay for Figma Plugin On Figma.
Import UI packages to an Android project in Android Studio.
Create and Use Content Parameters to dynamically change the content of a UI component.
Prerequisite
To successfully follow this tutorial, you need the following:
Basic knowledge of Android development with Kotlin and Compose.
Android Studio Electric Eel or later. I will be using Android Studio Electric Eel for this tutorial.
A free Figma account.
Now that we are all cleared up, the following section will help you import a splash screen.
Create a New Compose Project With Material3
Launch Android Studio.
Create a new Material3 Compose project.
Install The Relay For Android Studio Plugin
In Android Studio, go to Settings -> Plugins.
Search for "Relay for Android Studio" (see the image below).
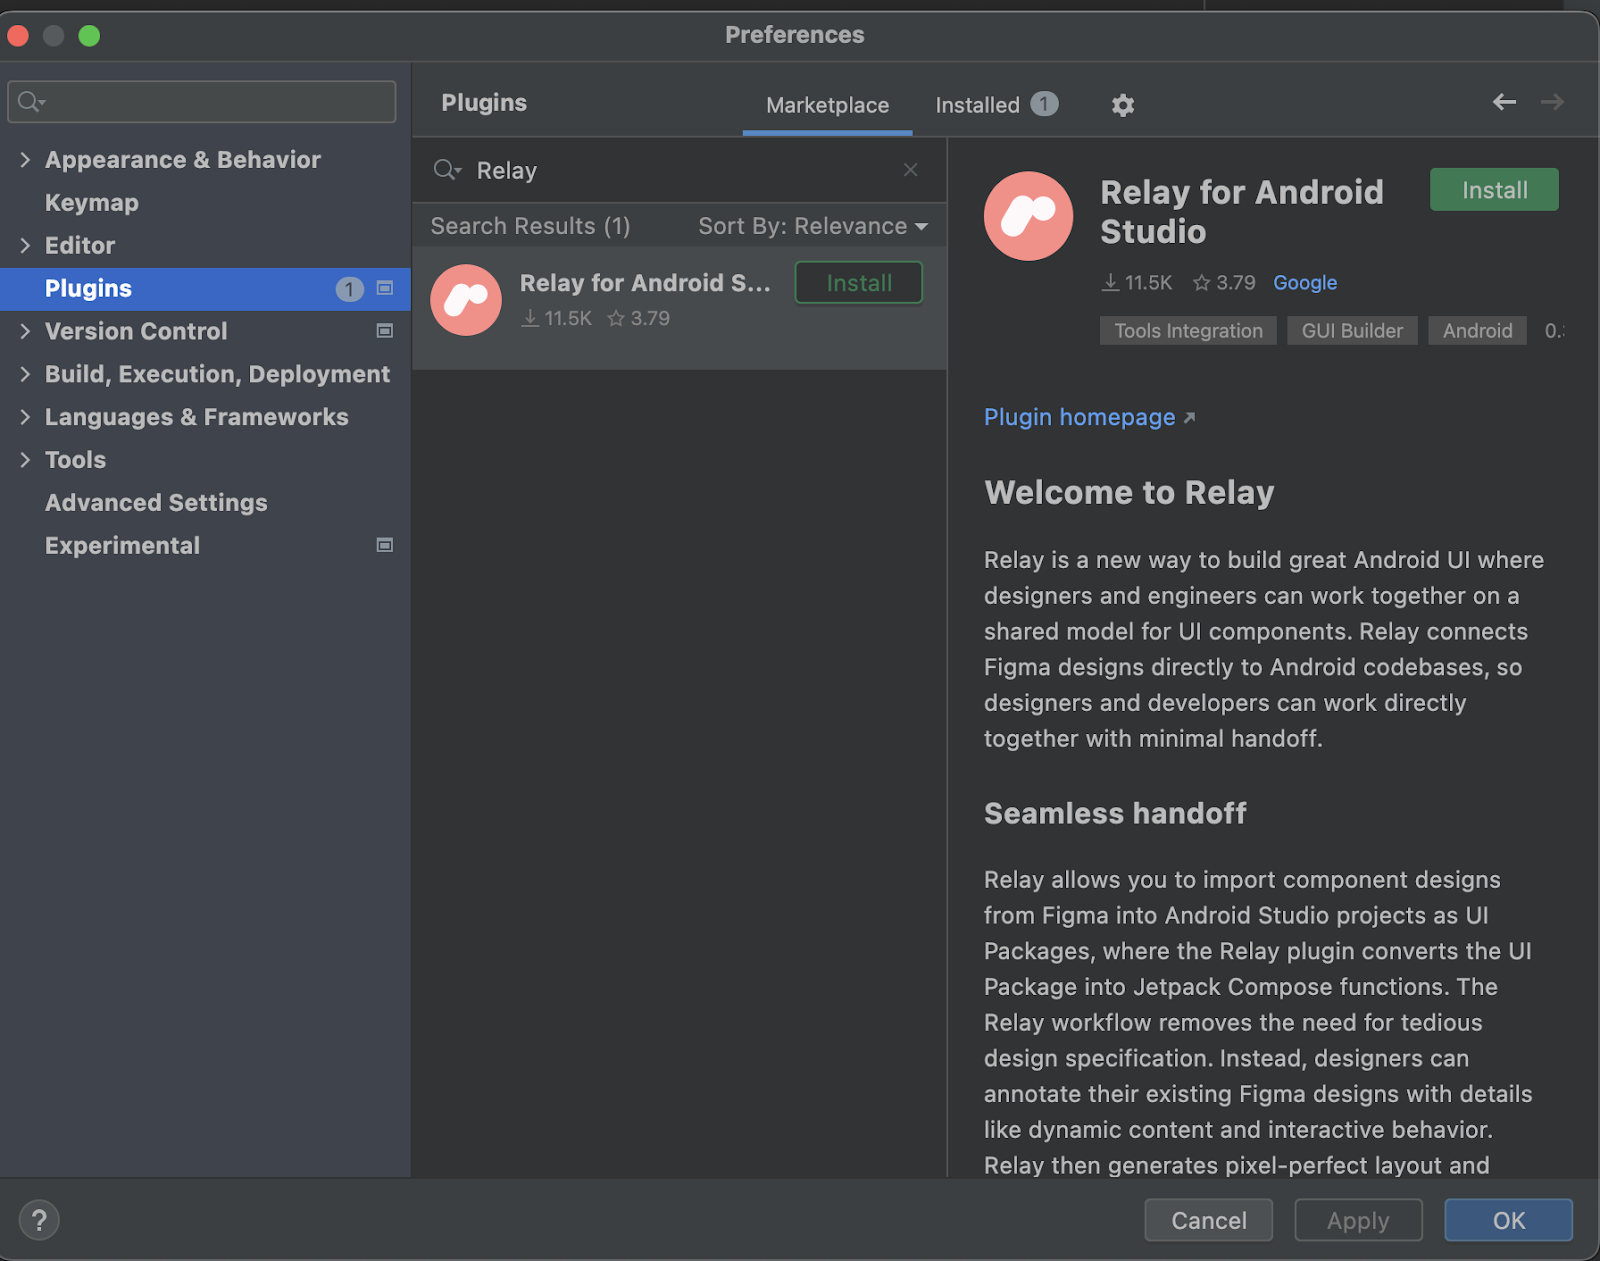
Click on Install and accept the Third-Party Plugins Privacy Note.
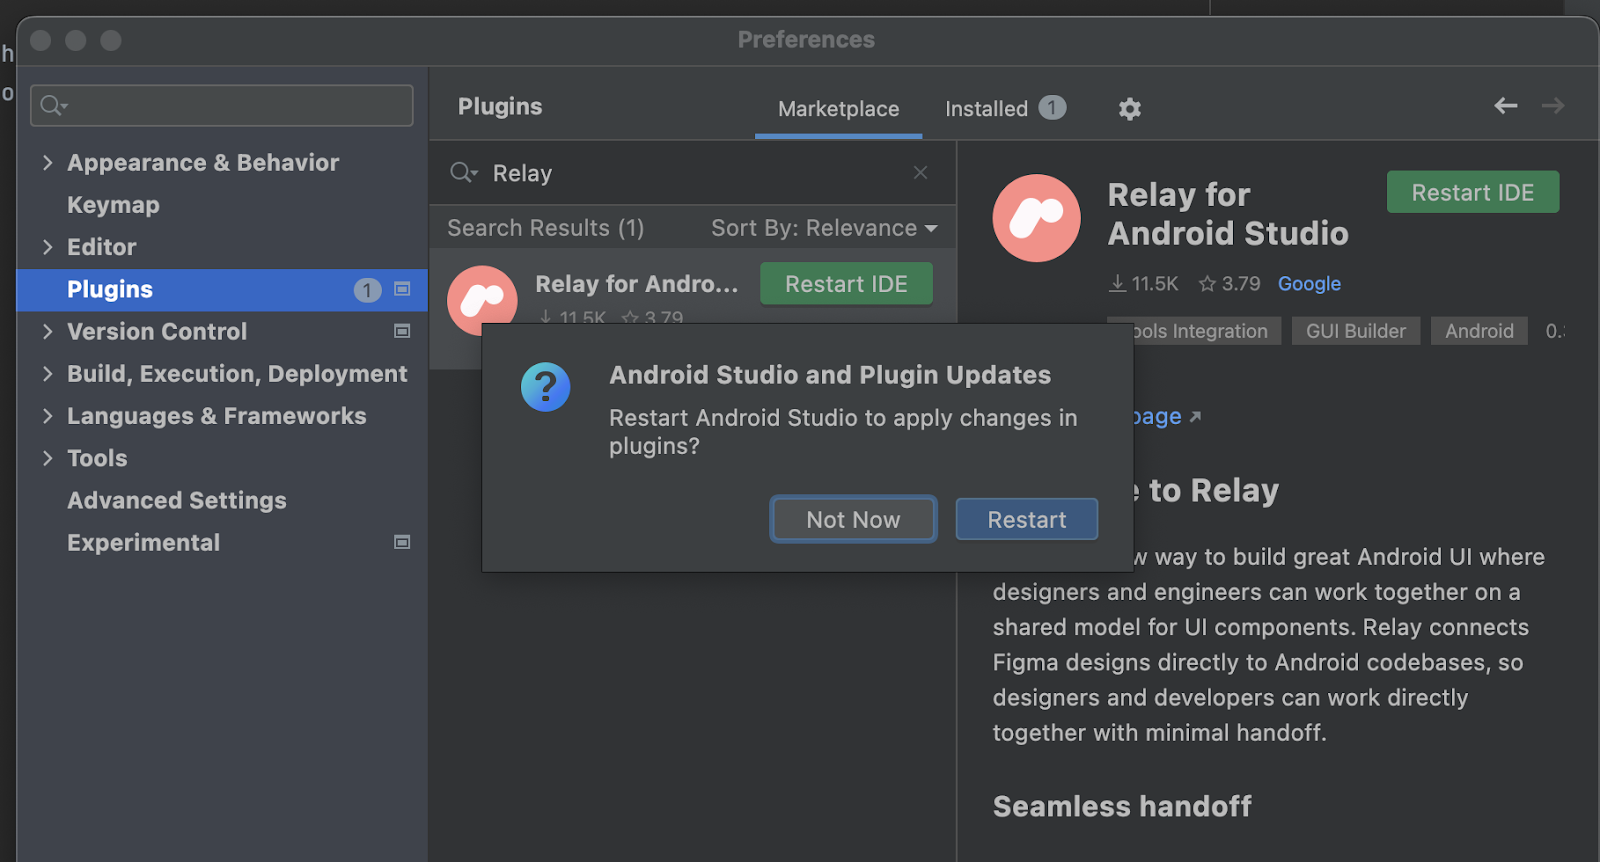
After installation, click on the "Restart IDE" button and select “Restart".
Generate Figma Personal Token
Log in to Figma.com or create an account.
Click on your profile icon at the top left corner of the screen. From the drop-down menu under your profile, click on "Settings".
- Scroll down to the "Personal access tokens" section and click on "Generate new token".

- In the window that appears, enter a token name in the text Field. In the "Expiration" Section, you can choose how long you want this token to last and manage its scope in the Scopes section.
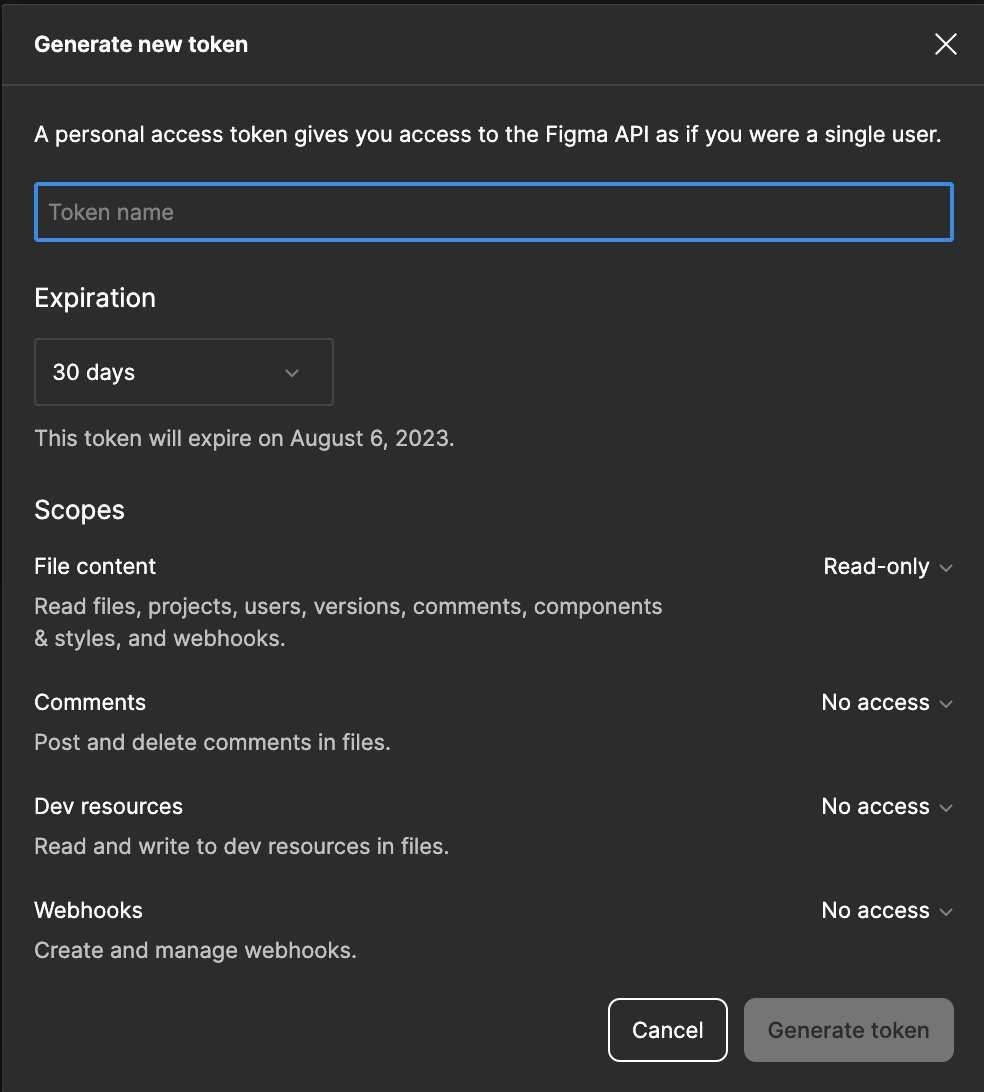
Click on "Generate token".
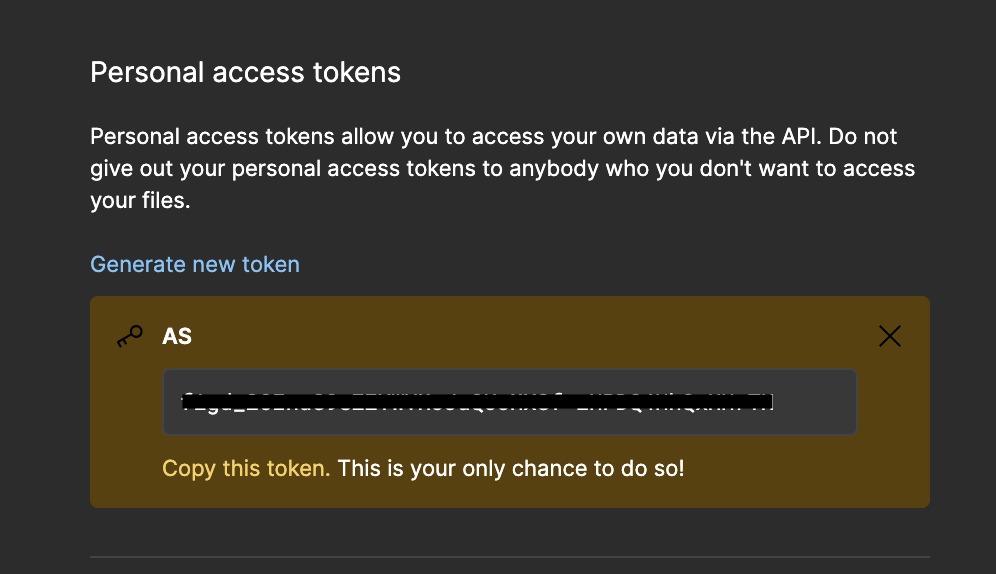
On the dialogue box that appears, click on "Copy this token" to copy the generated token and save it in a secure place.
Add The Figma Access Token To Android Studio
In Android Studio, navigate to Tools -> Relay Settings
In the dialogue that appears, paste the generated token into the "Figma Access Token" text field.
Click on "OK".
Add the Relay Gradle plugin to your project
The Relay Gradle plugin ensures the correct generation of Composable functions from the Figma UI components during the build process.
To add the Relay Gradle Plugin:
- In your module-level
build.gradlefile (app/build.gradlein this tutorial), add the following code to thePluginssection:
plugins {
    id 'com.android.application'
    id 'org.jetbrains.kotlin.android'
    id 'com.google.relay' version '0.3.07'
}
You can get the latest version of the Relay Gradle plugin here
- Make sure your
settings.gradlefile includes thepluginManagementsection with the following repositories:
pluginManagement {
    repositories {
        google()
        mavenCentral()
        gradlePluginPortal()
    }
}
- Sync your project to apply the changes.
Install Relay for Figma Plugin On Figma
The Relay for Figma Plugin enables designers to add extra information to UI components for easy and accurate conversion to Jetpack Compose in Android Studio by developers.
To install the Relay for Figma Plugin:
Open this link to access the UI component on Figma.
Click on "Open in Figma" to open the UI component on Figma.
In the top-left corner of the screen, click on the main menu (represented by the Figma icon) and go to Plugins -> Find more Plugins.
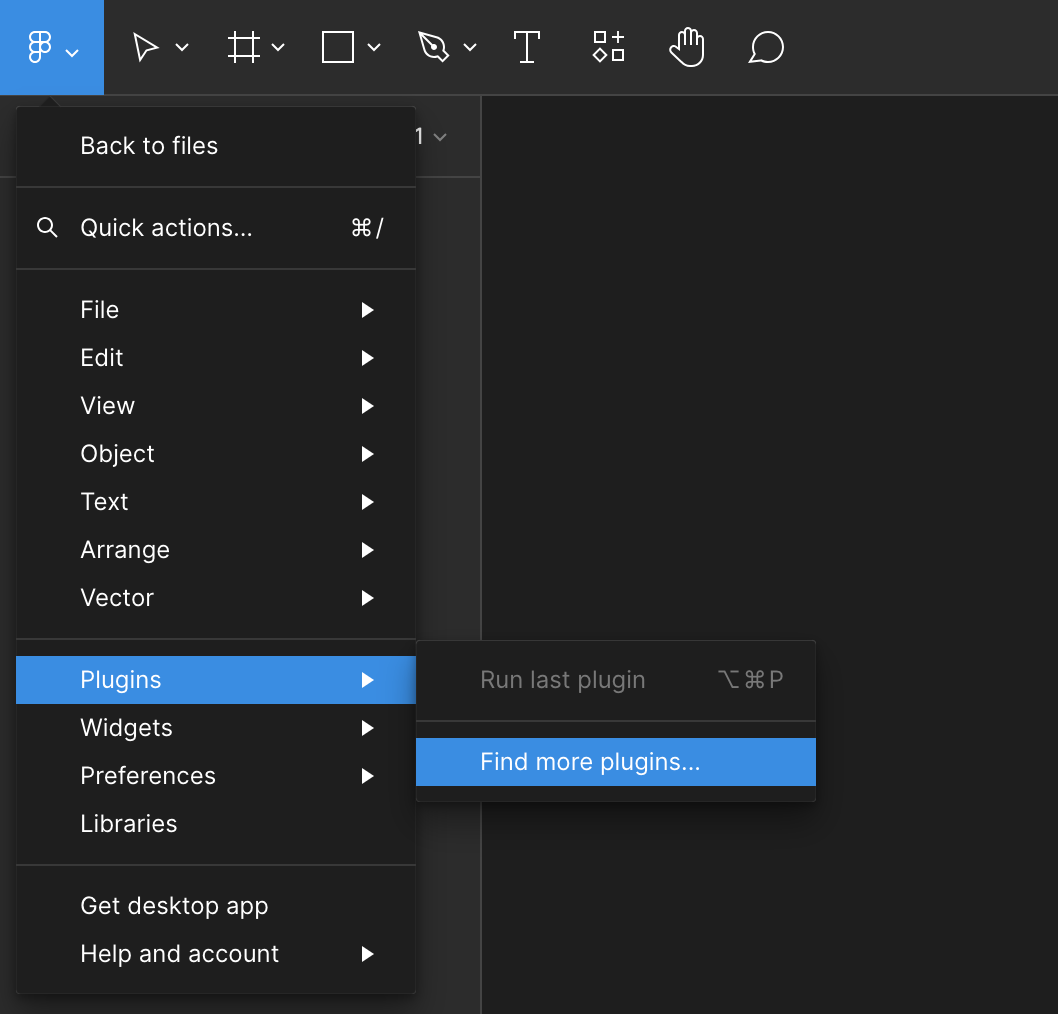
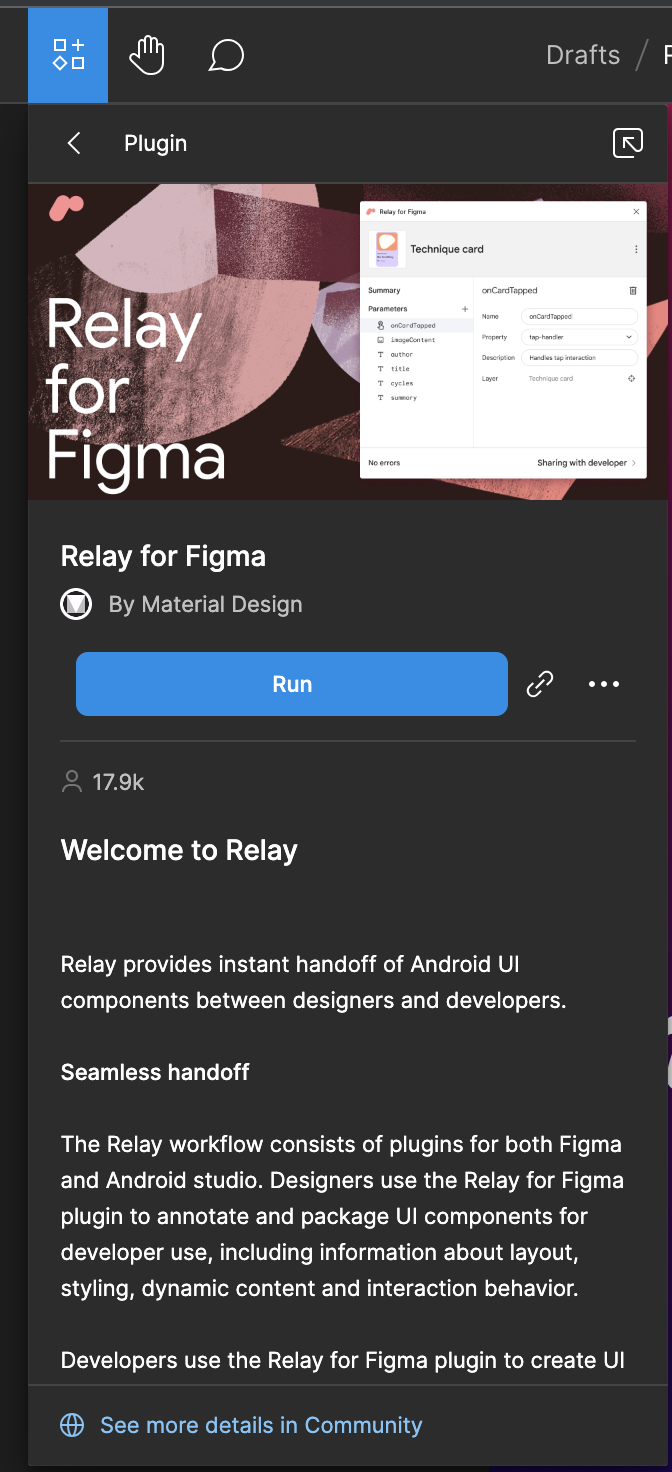
In the search bar, enter "Relay for Figma" and the Relay for Figma Plugin will appear.
Click on the "Run" button.
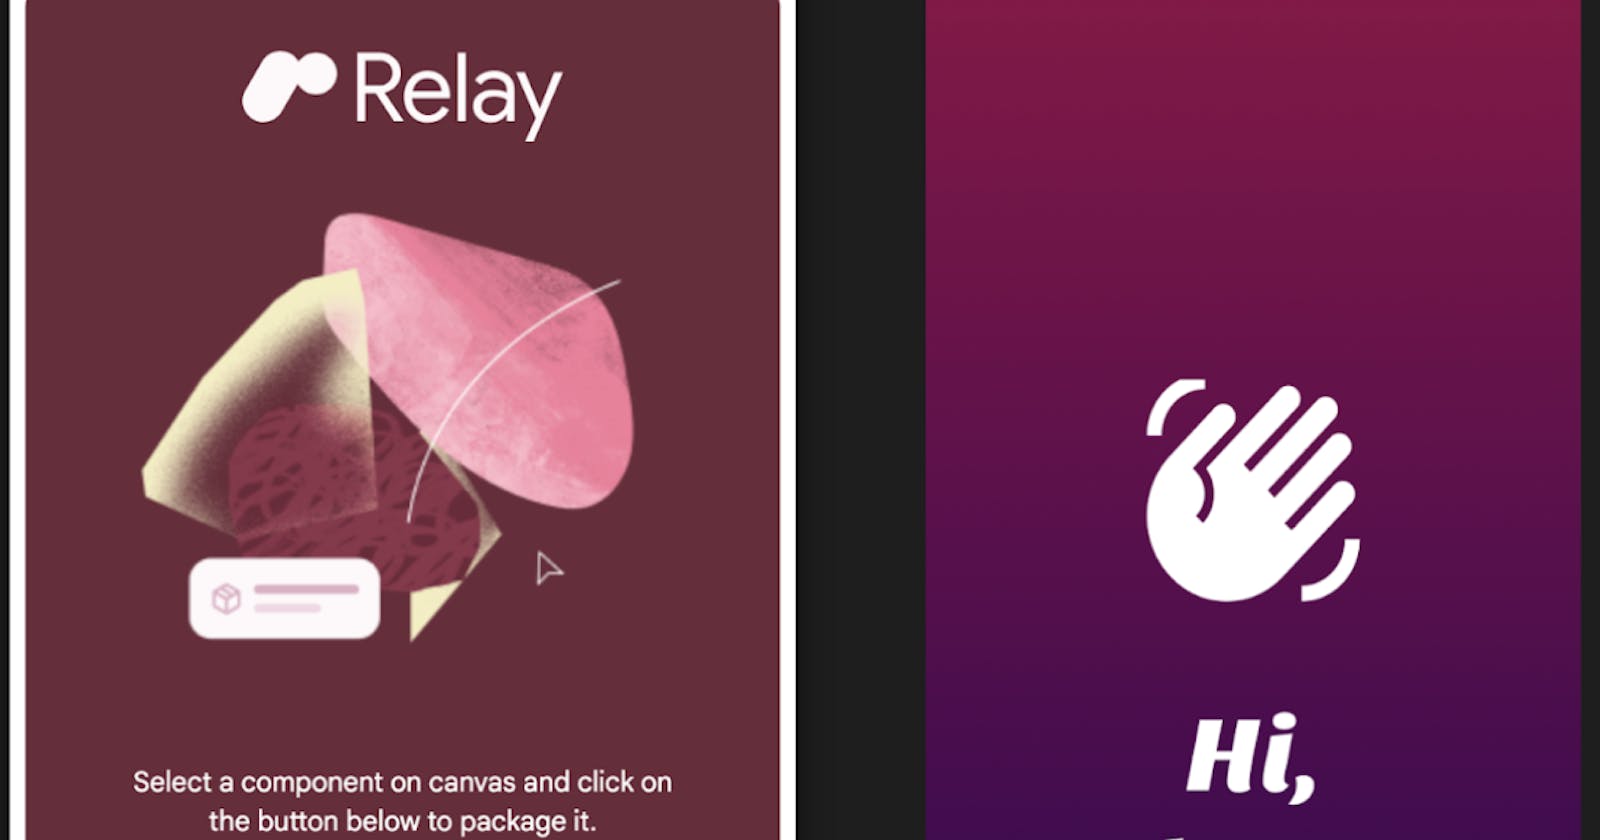
- The Relay plugin now activates on the Figma board.
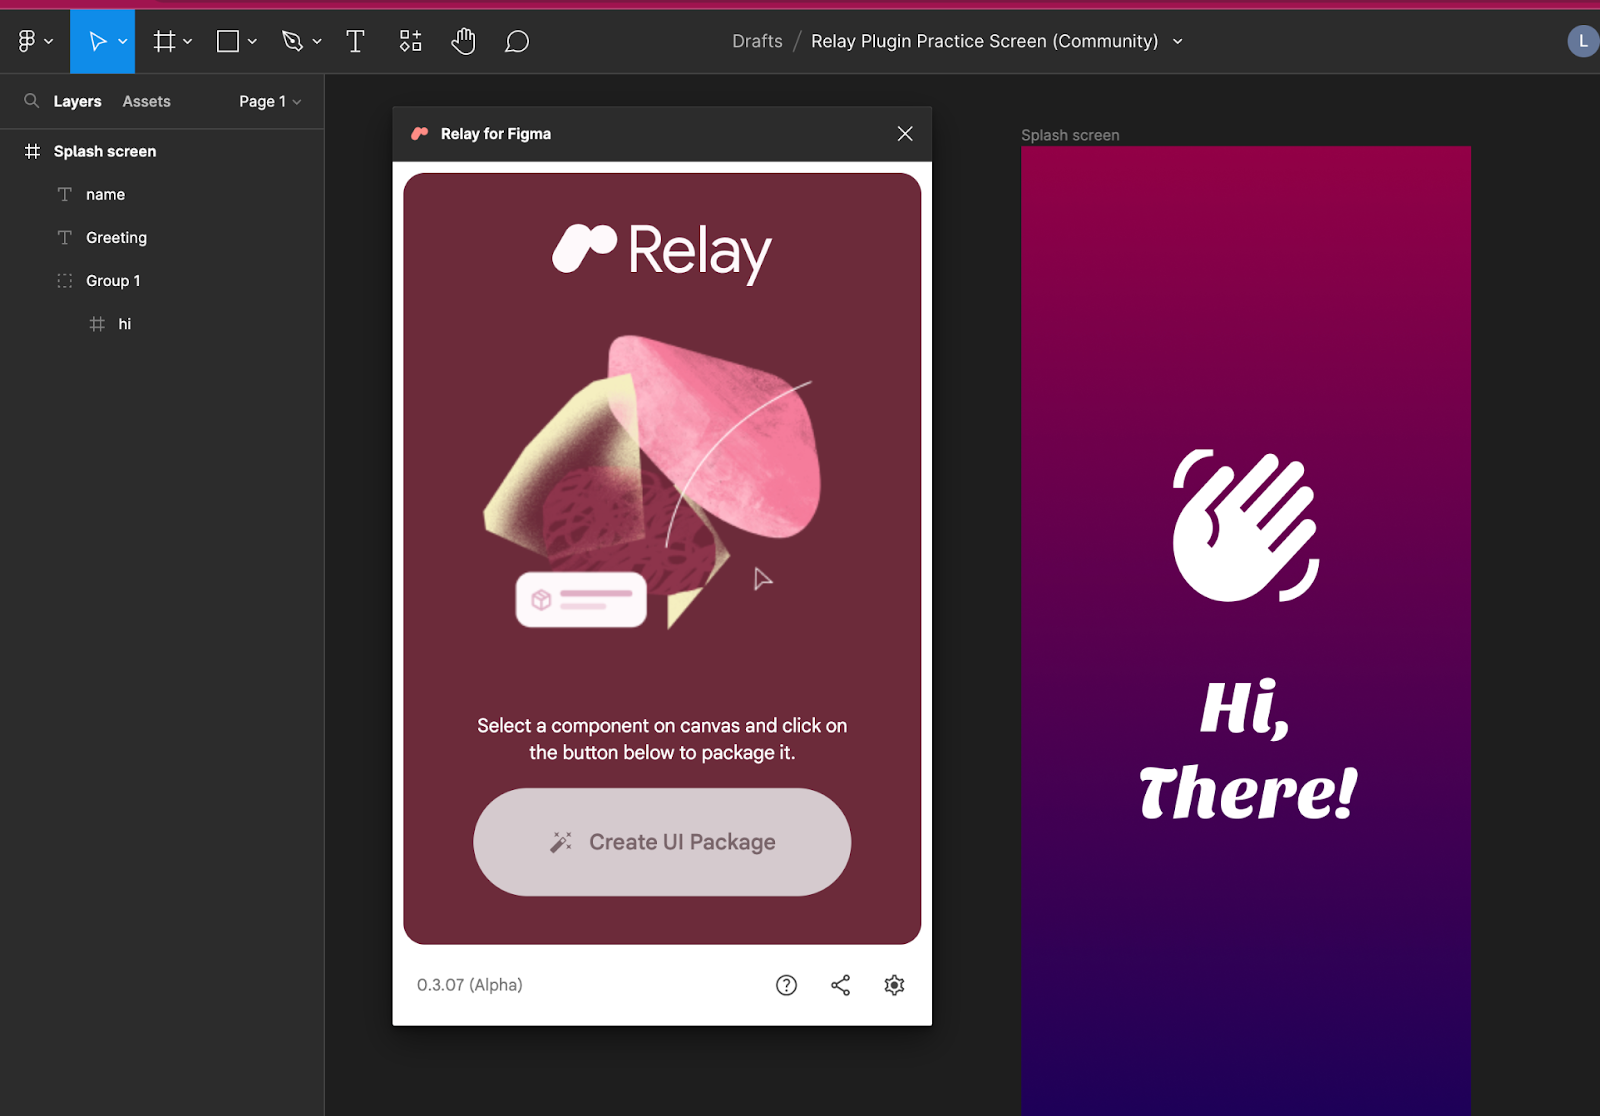
Create a UI Package
To create a UI package:
Select the splash screen frame from the left sidebar, right-click, and select "Create component".
If the Relay for Figma plugin is not running, open it by going to Menu -> Plugins -> Relay for Figma.
Select the Component and Click on the "Create UI Package" button on the Relay for Figma Plugin window.
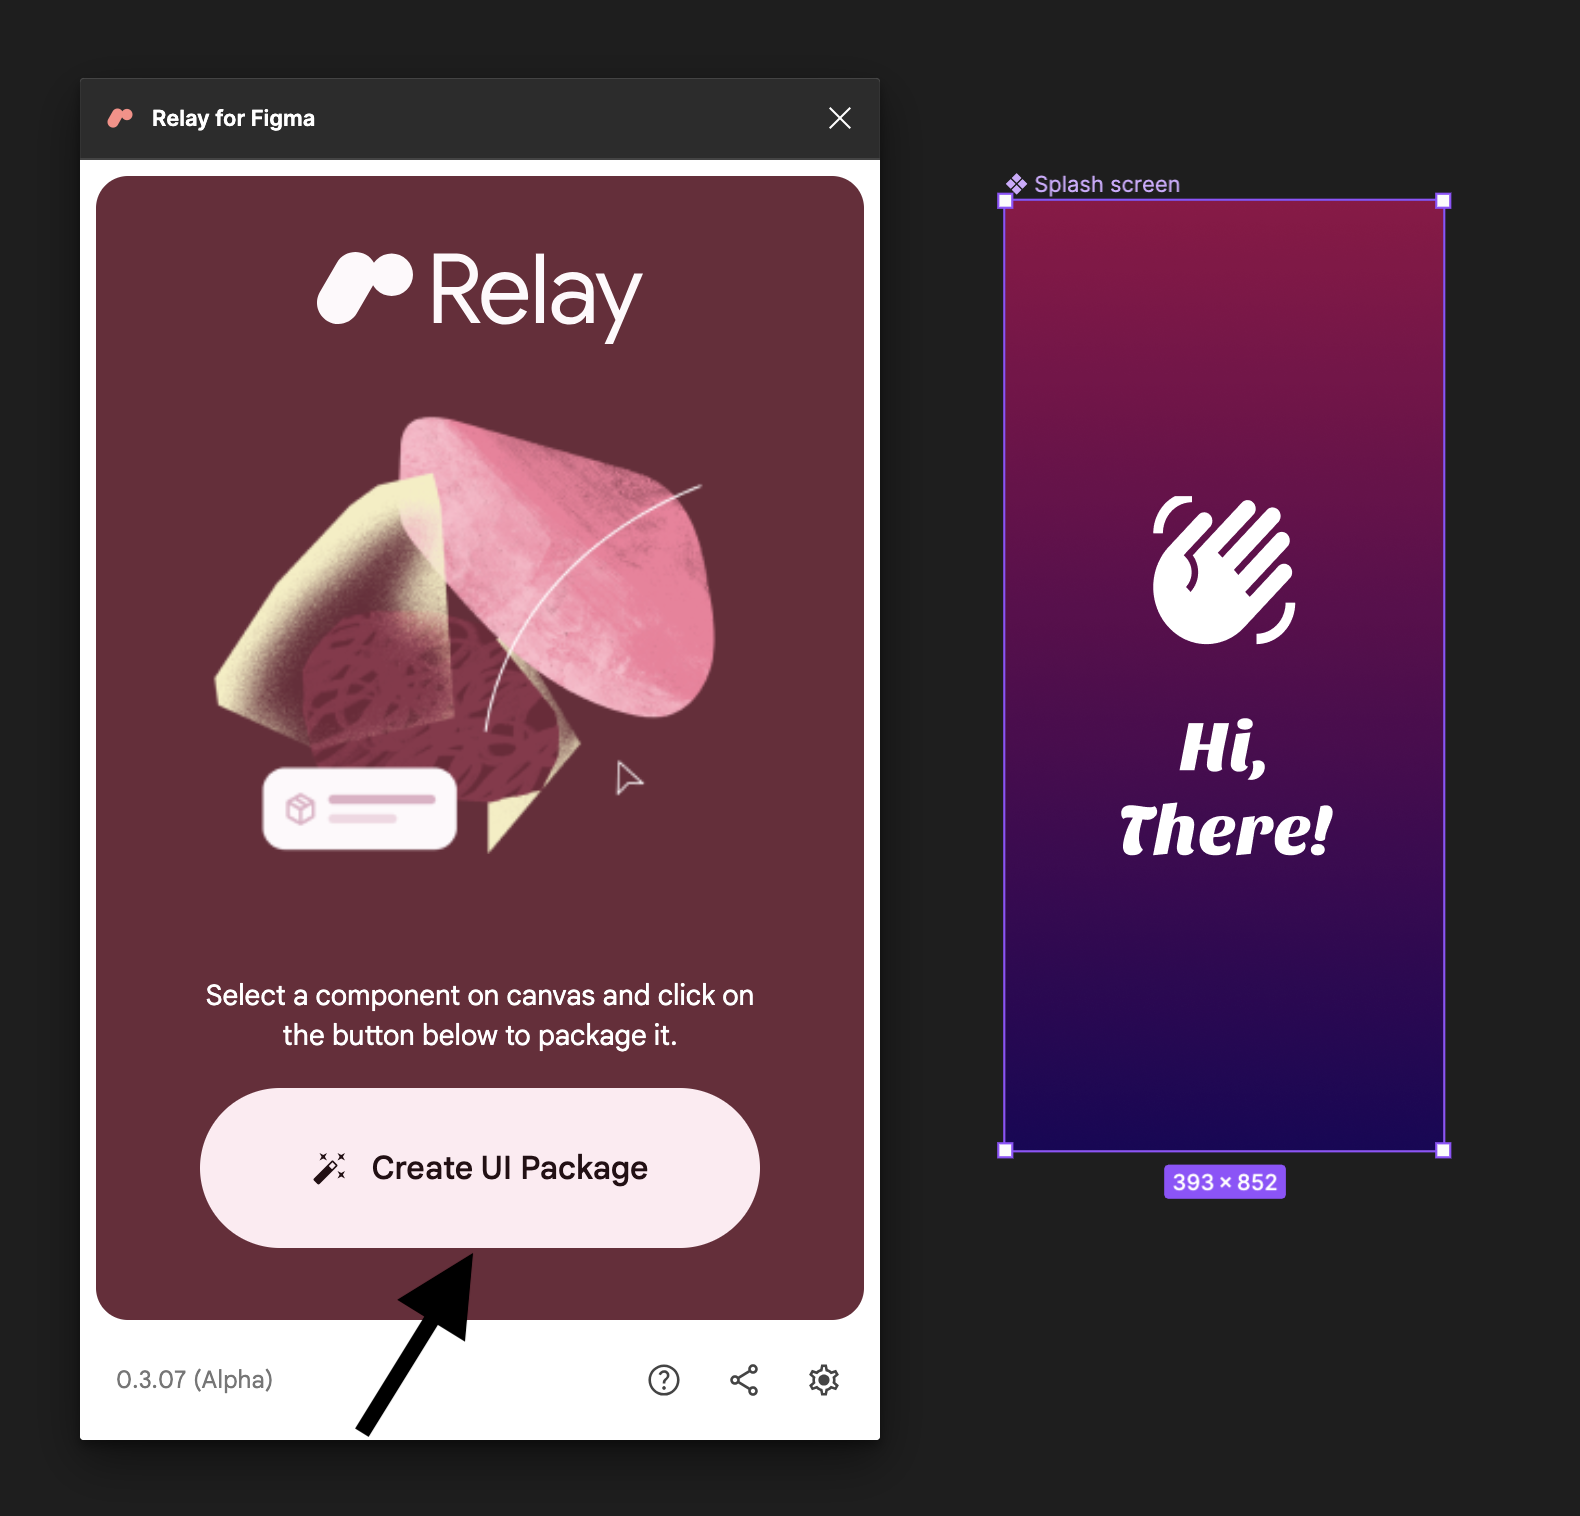
- In the window that appears, enter a description for the component in the summary input text field.
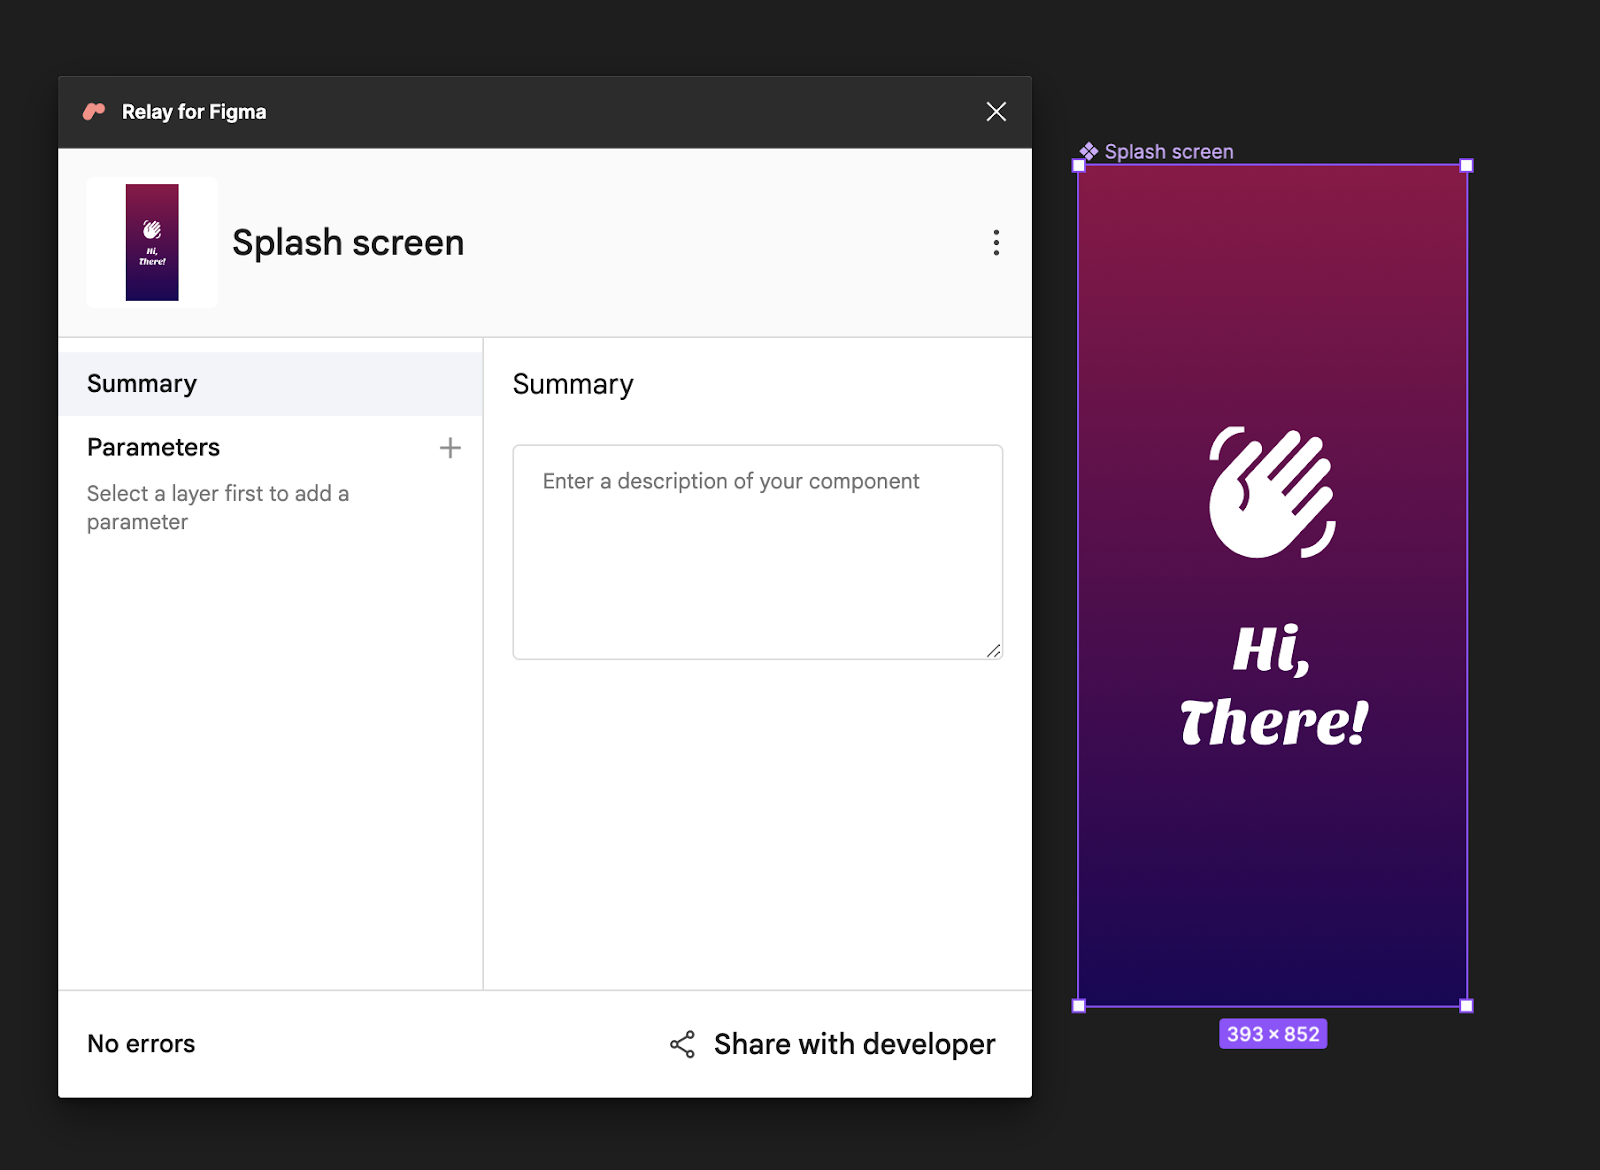
Click on "Share with developer".
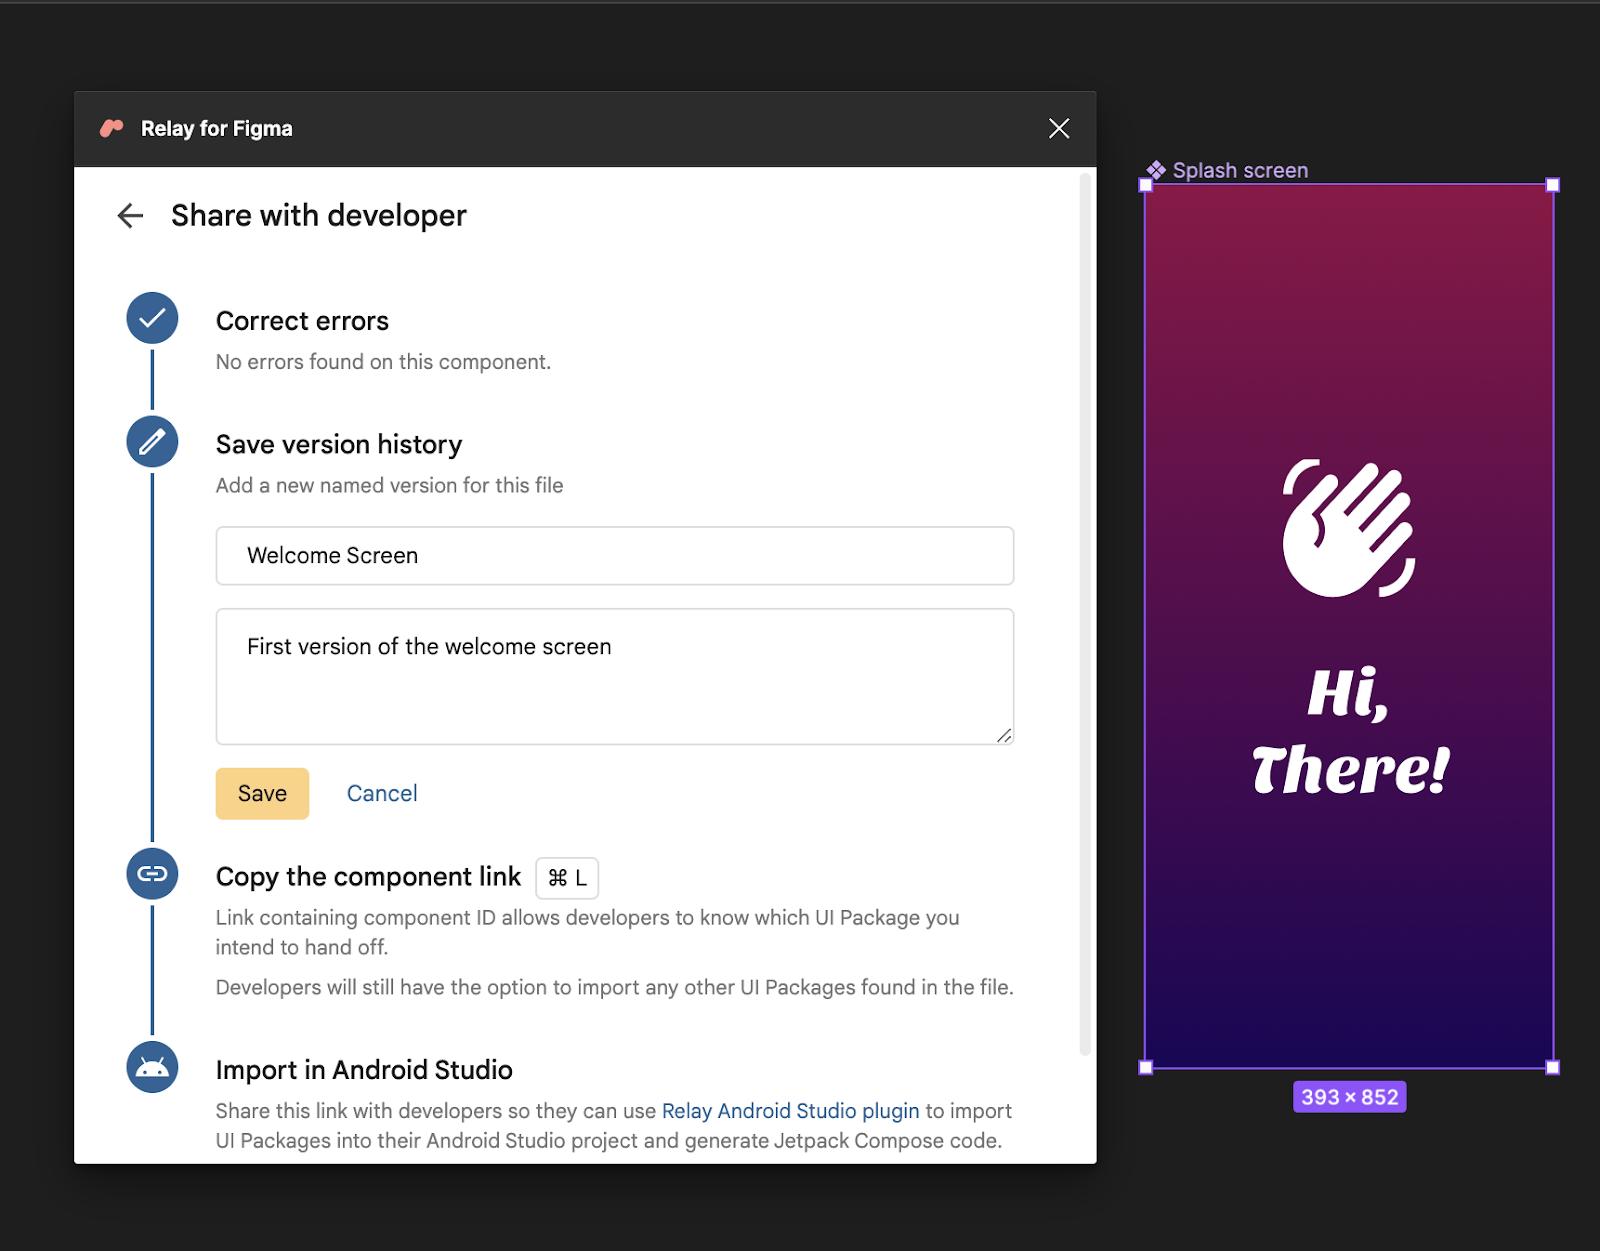
In the Share with developer window that appears, under the Save version history section, enter a version name for the file and describe the changes made(similar to commits).
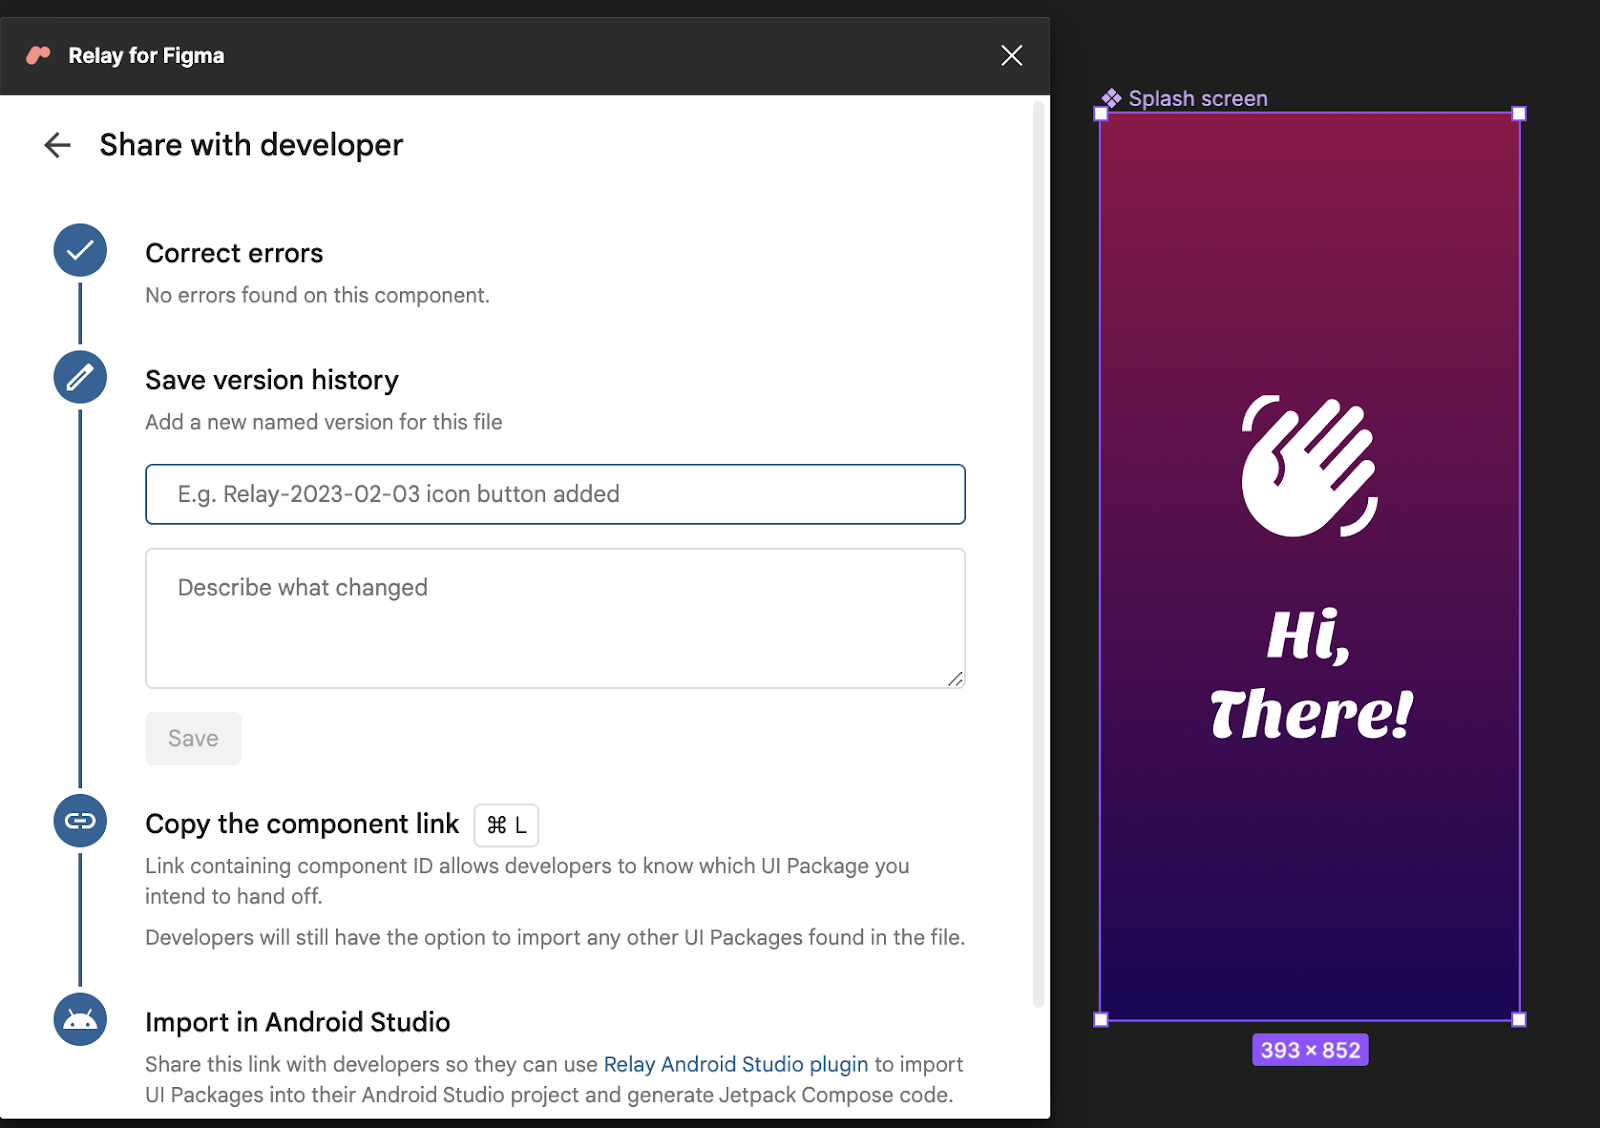
- Click on "Save".
- Copy the shareable component link by pressing
CMD+L(Mac) orCTRL+L(Windows) andCMD+C(Mac) orCTRL+L(Windows). This link will be shared with the developer for importing the UI package.
Import UI Packages in Android Studio
To import UI packages in your Android Studio project:
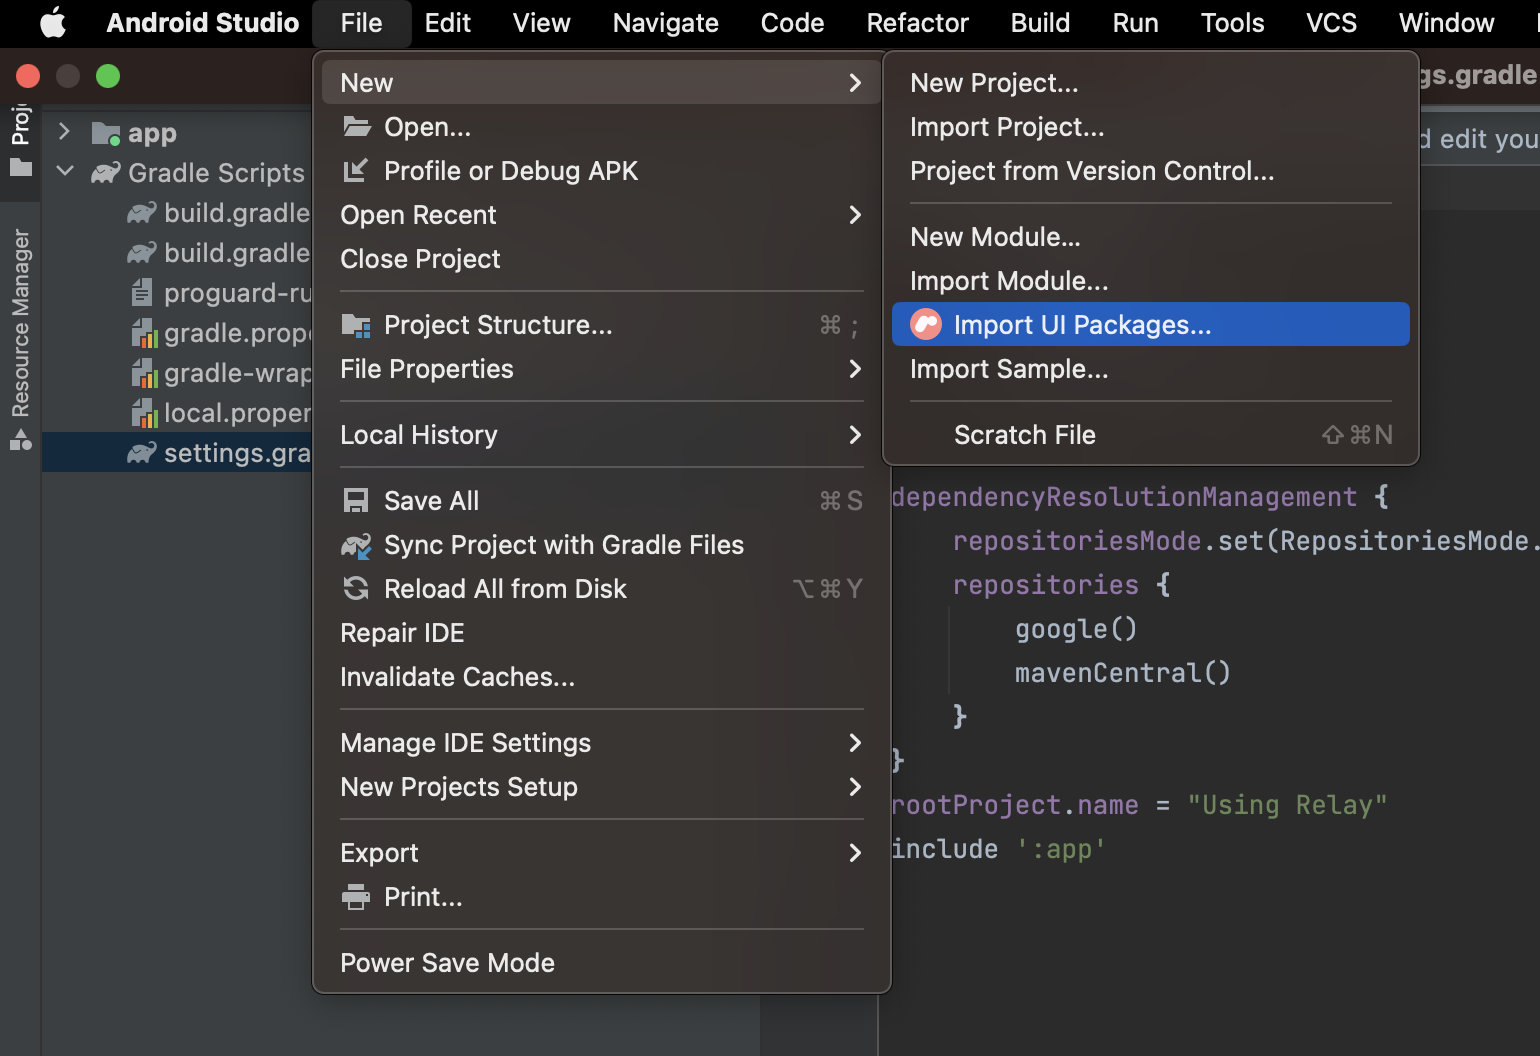
- In your project on Android Studio, go to File > New > Import UI Packages.
In the Import UI Packages dialogue box that opens, paste the component link from Figma into the Figma source URL input text field.
In the App Theme text field, select the desired theme (e.g. Material 3 theme in this tutorial).
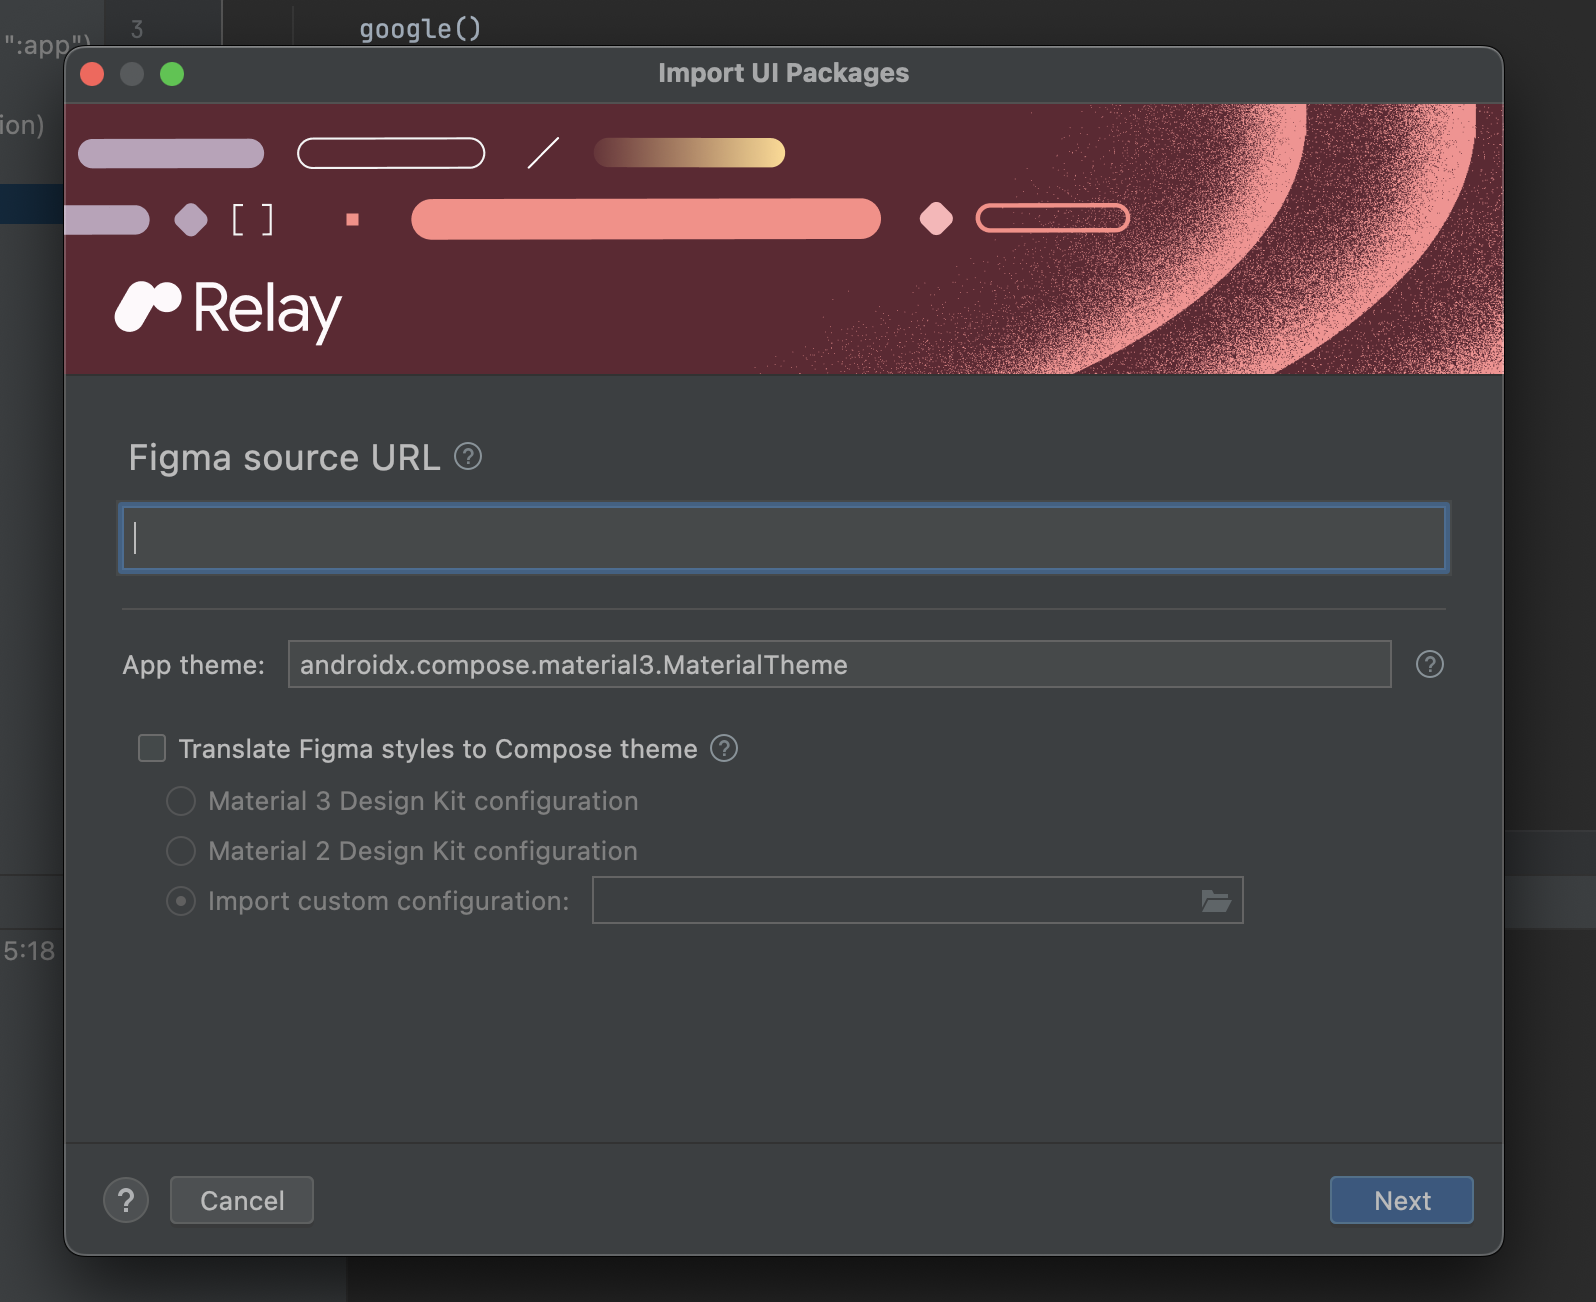
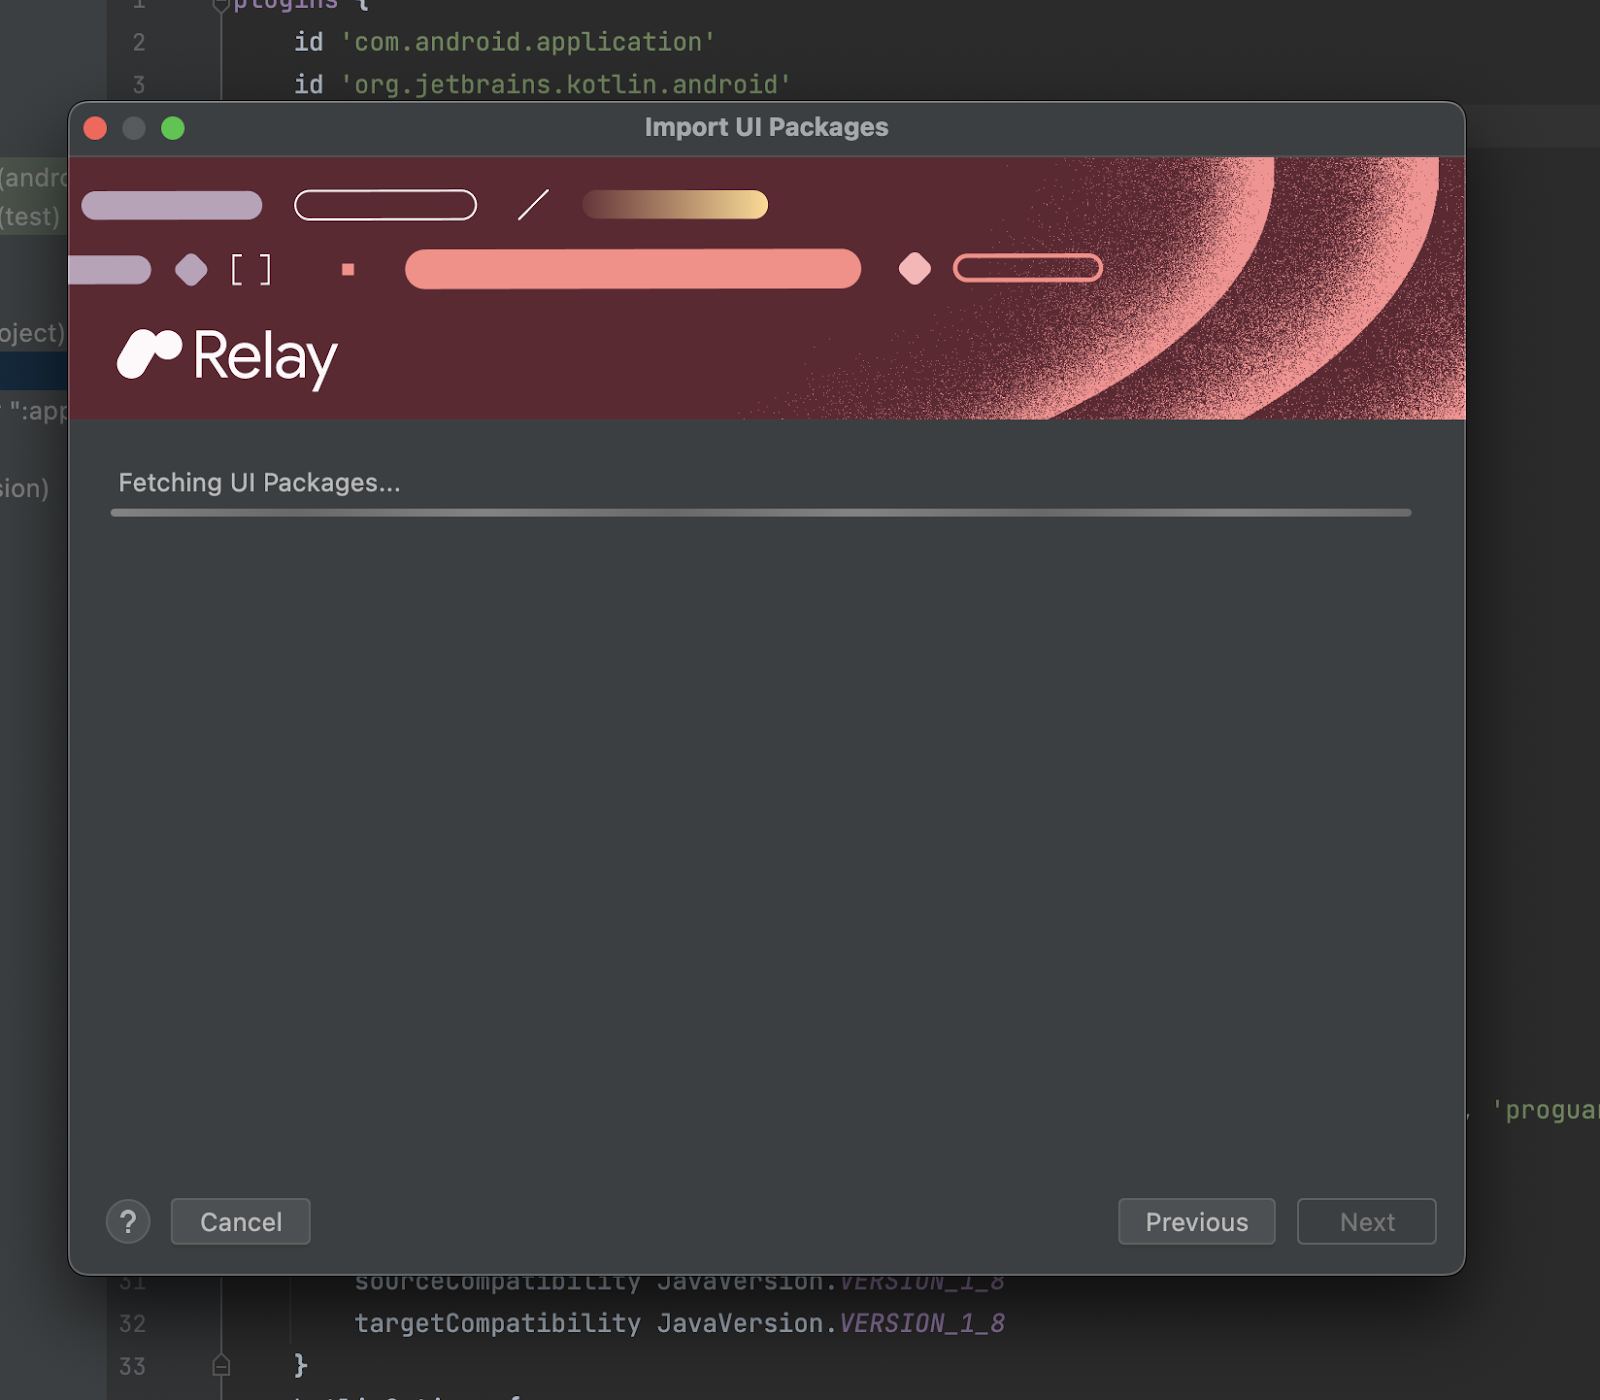
- Click on "Next" to fetch the UI packages. A loading screen will appear as shown below:
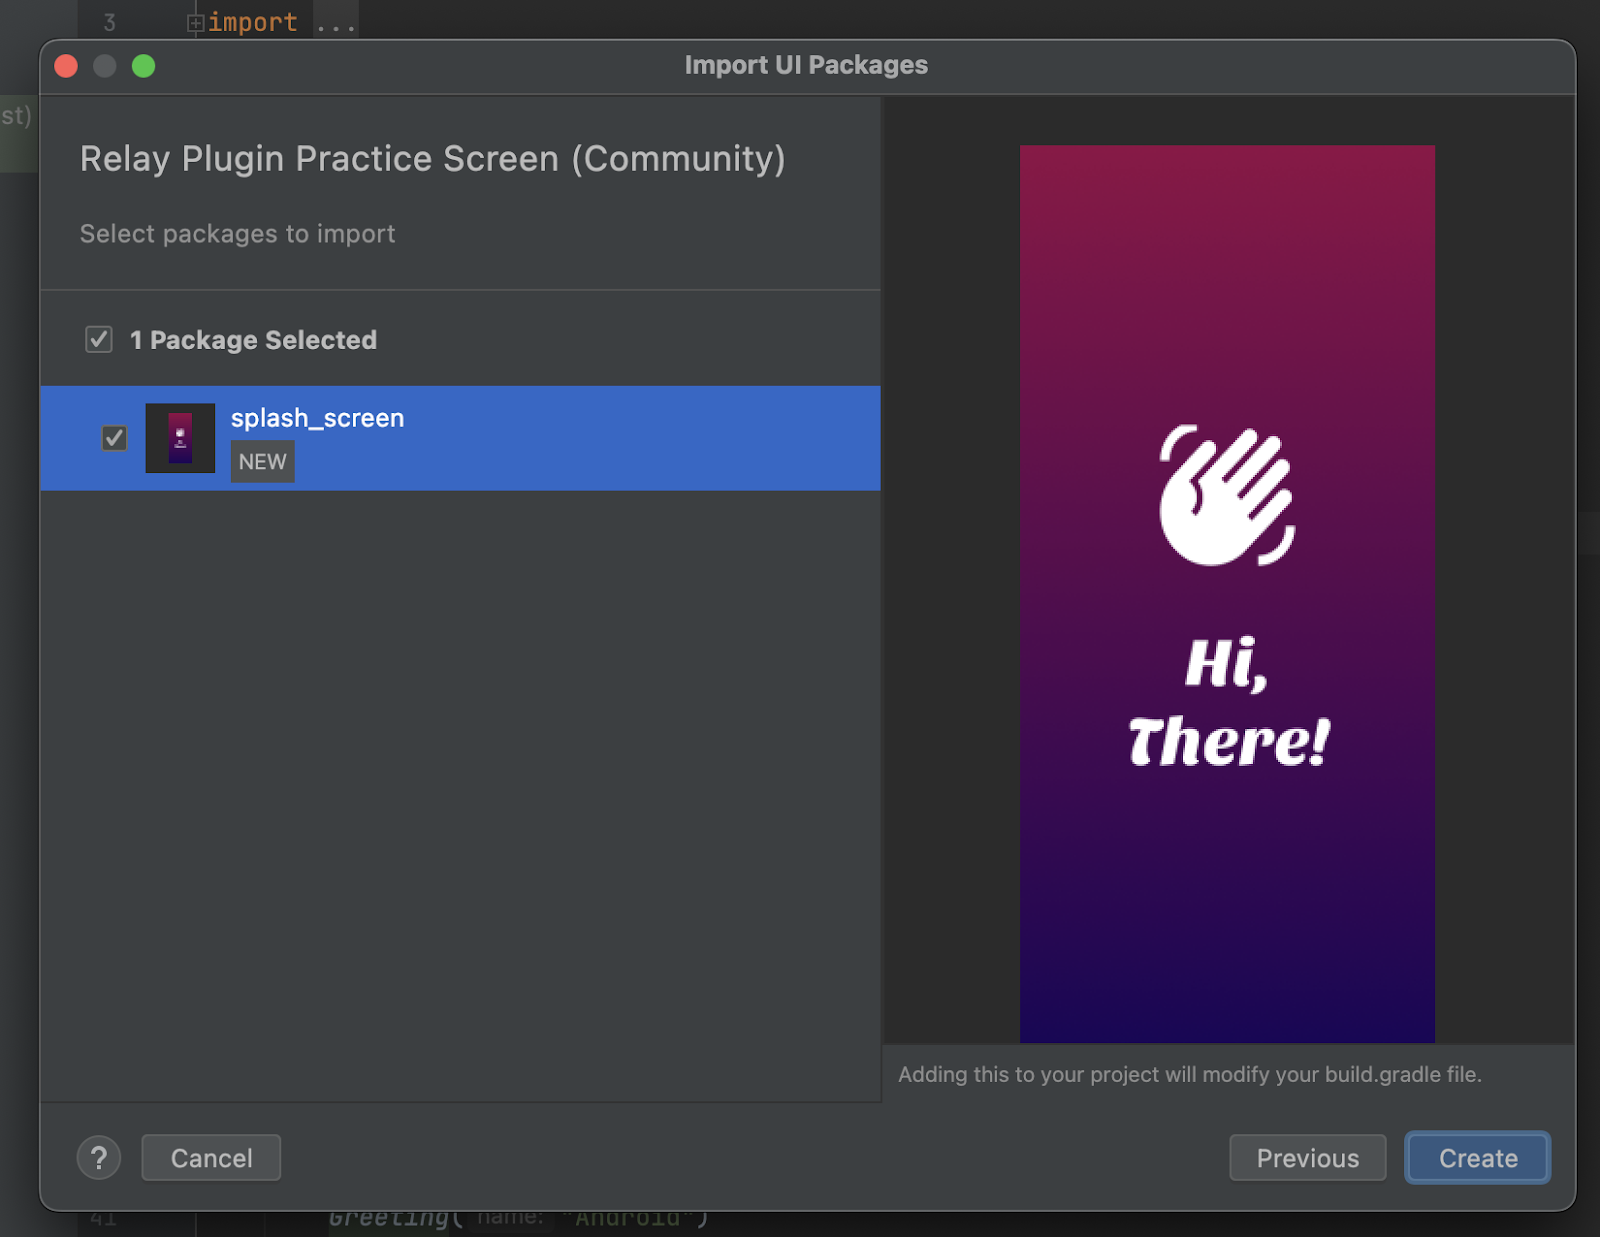
Once the fetching is complete and the UI packages are fetched, make sure all packages are selected on the left panel.
Click on "Create" to import the packages into your Project.
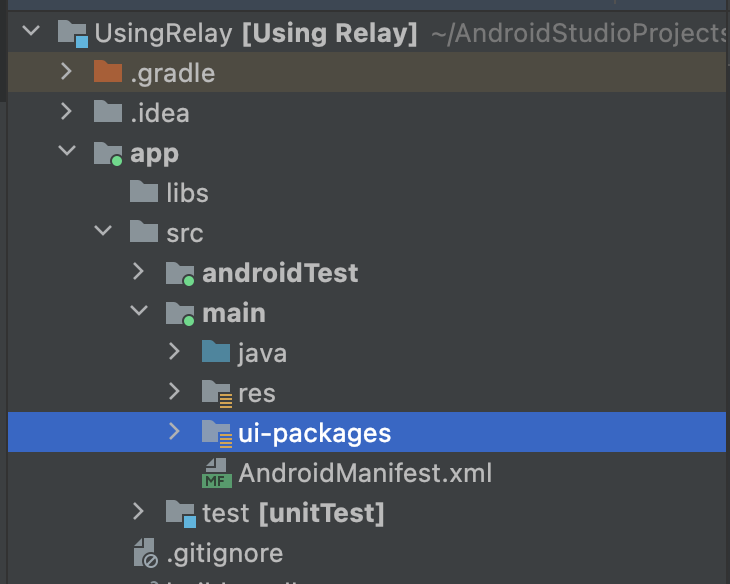
- In the Android file project view, You will see the
ui-packagesfolder, which contains the imported Figma packages and their JSON format API inside theapp/mainfolder. If you do not see theui-packagesfolder, right-click on theappfolder and select "Reload from Disk".
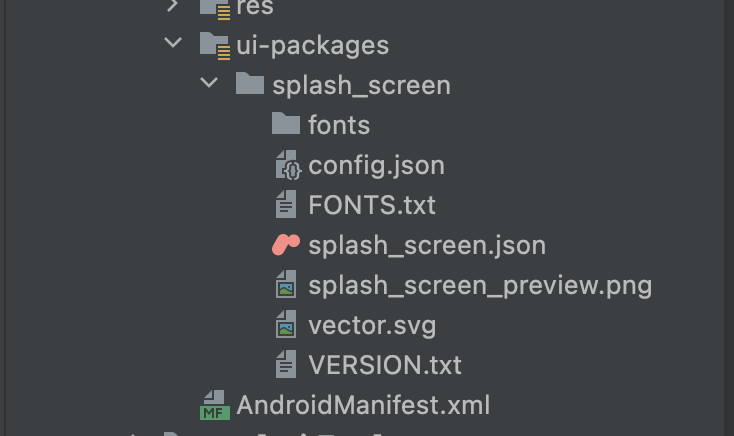
Inside the ui-packages folder, you will find the splash_screen folder (app/ui-packages/splash_screen/*), which contains all the assets required to describe the splash screen in code. This folder includes a JSON file that contains the layout properties of the UI component, along with other files containing information about:
fonts,
themes,
image assets, and
the version of the Relay plugin used to import it to Android Studio.
Generate The Composable Functions
To build and generate the composable functions for the splash_screen UI package:
On your Android Studio toolbar, click on "Make project". This will generate the composable function for the UI package and add it to the project folder.
After a successful build, in the Android view of your project, you can see the generated composable function
SplashScreen.ktin thejavafolder.
In SplashScreen.kt you can see that our splash_screen UI Component from Figma has been converted to code as shown below:
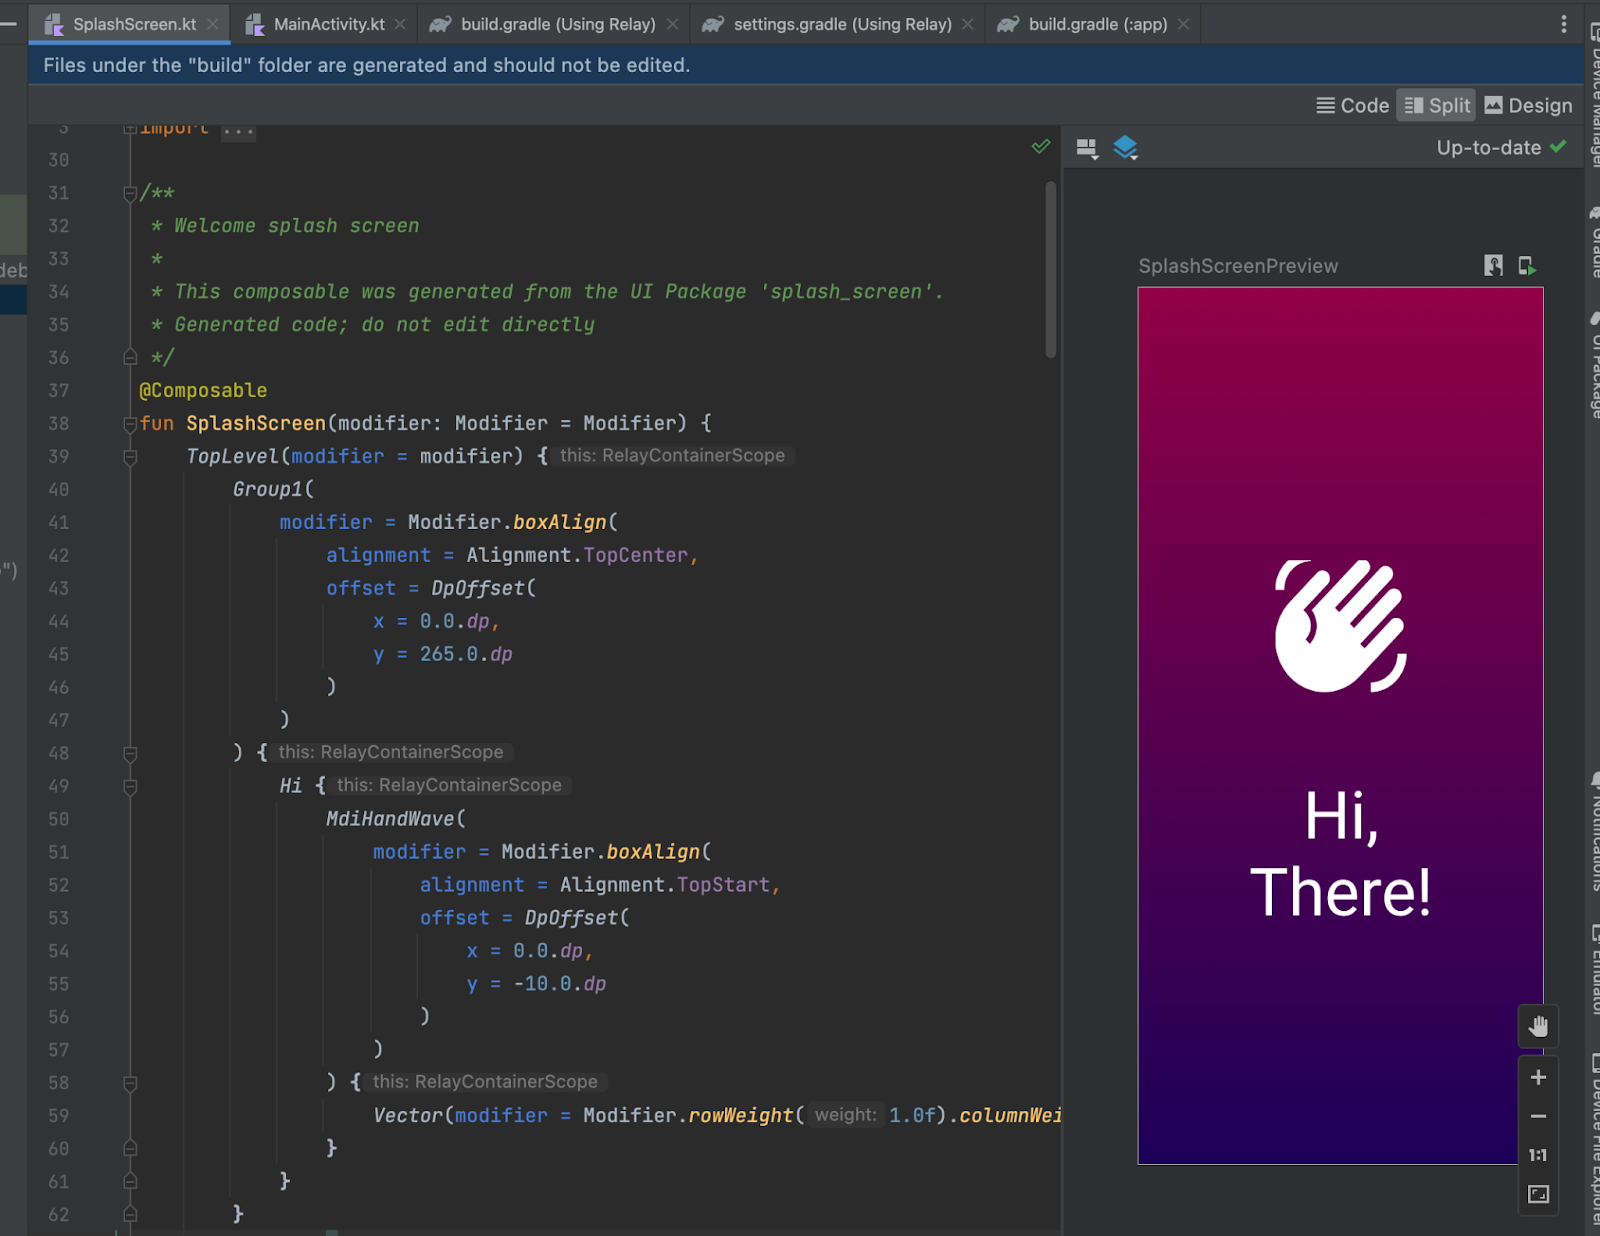
You can see that the SplashScreen Composable function has the modifier as the default parameter.
Use The Generated Composable Function
To use the generated composable:
- In your
MainActivity.kt, inside thesetContent{}, replace the function call toGreeting("Android")withSplashScreen()as shown below:
class MainActivity : ComponentActivity() {
   override fun onCreate(savedInstanceState: Bundle?) {
       super.onCreate(savedInstanceState)
       setContent {
           UsingRelayTheme {
               // A surface container using the 'background' color from the theme
               Surface(
                   modifier = Modifier.fillMaxSize(),
                   color = MaterialTheme.colorScheme.background
               ) {
                   SplashScreen()
               }
           }
       }
   }
}
- Replace the function call to
Greeting("Android")withSplashScreen()in theDefaultPreview()Composable function in theMainActivityclass.
@Preview(showBackground = true)
@Composable
fun DefaultPreview() {
   UsingRelayTheme {
       SplashScreen()
   }
}
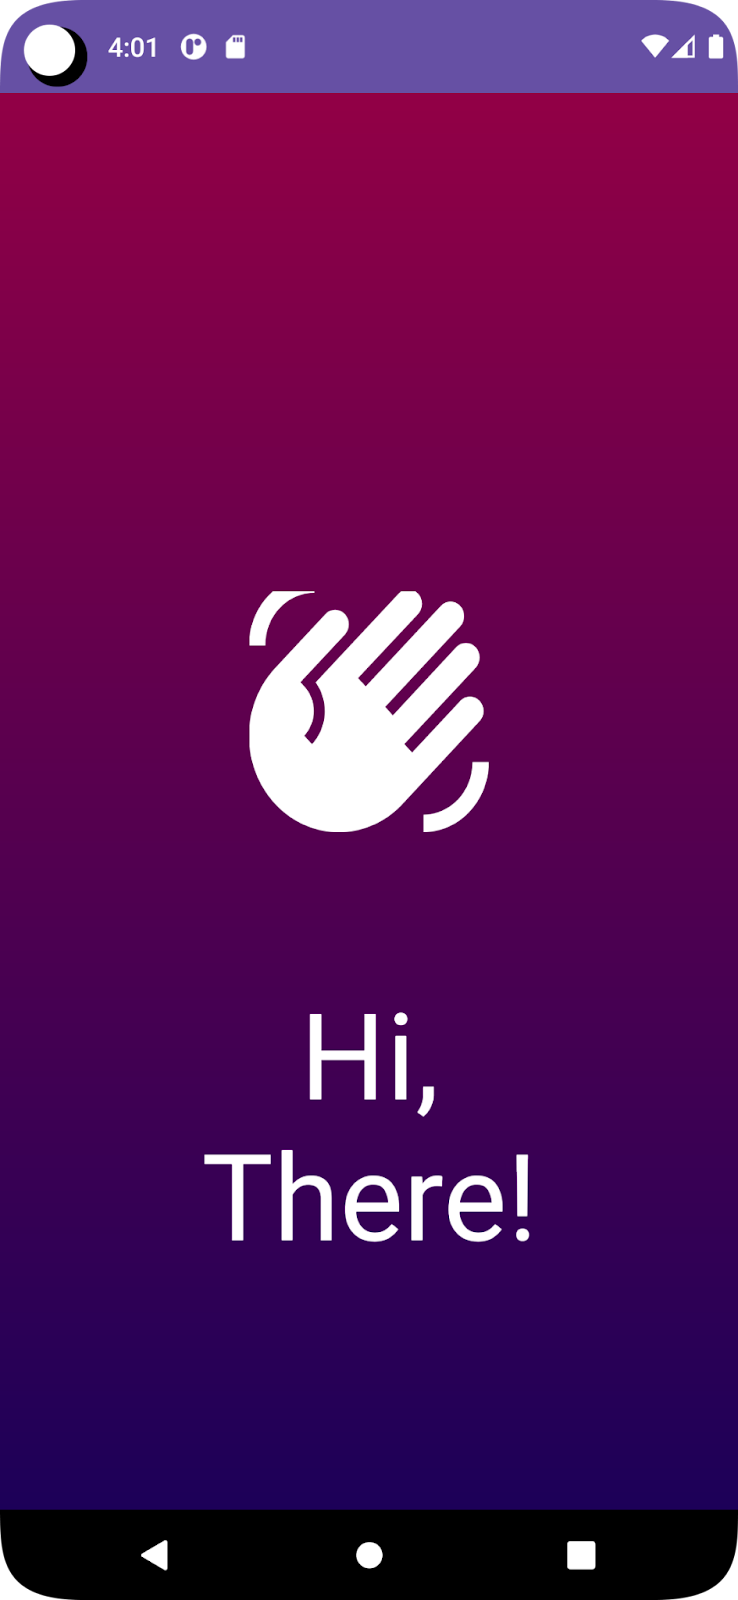
- Run your project as you normally would.
Voila! You will see the splash screen displayed on the mobile device as shown below:
Update UI to Use Content Parameters
You will create a content parameter for your name which will replace the static string: “There” in the UI.
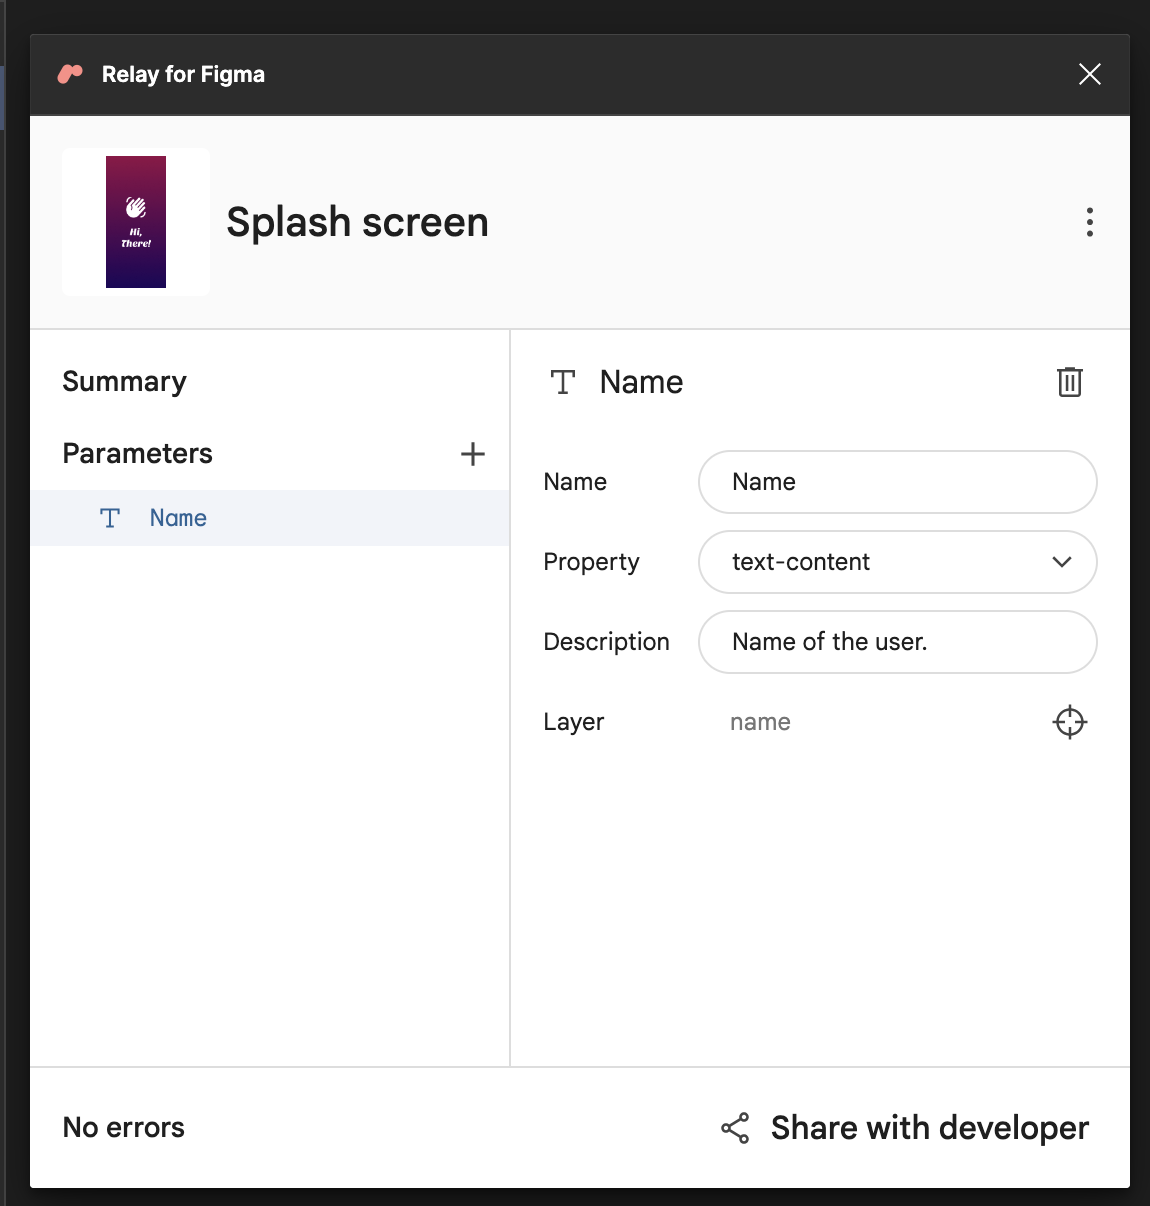
Add a Content Parameter to Figma UI
In this section, you will update the splash screen design in Figma to use content parameters. Content Parameters are variables that can be used to change the content of a UI component in real-time.
If the Relay for Figma plugin is not running, open it by going to Menu -> Plugins -> Relay for Figma.
Select the Splash screen component and
CMD + click(Mac) orCTRL + click(Windows) on the text: “There” to select the "name" layer. You can also select the name layer by clicking on "name" in the left sidebar.
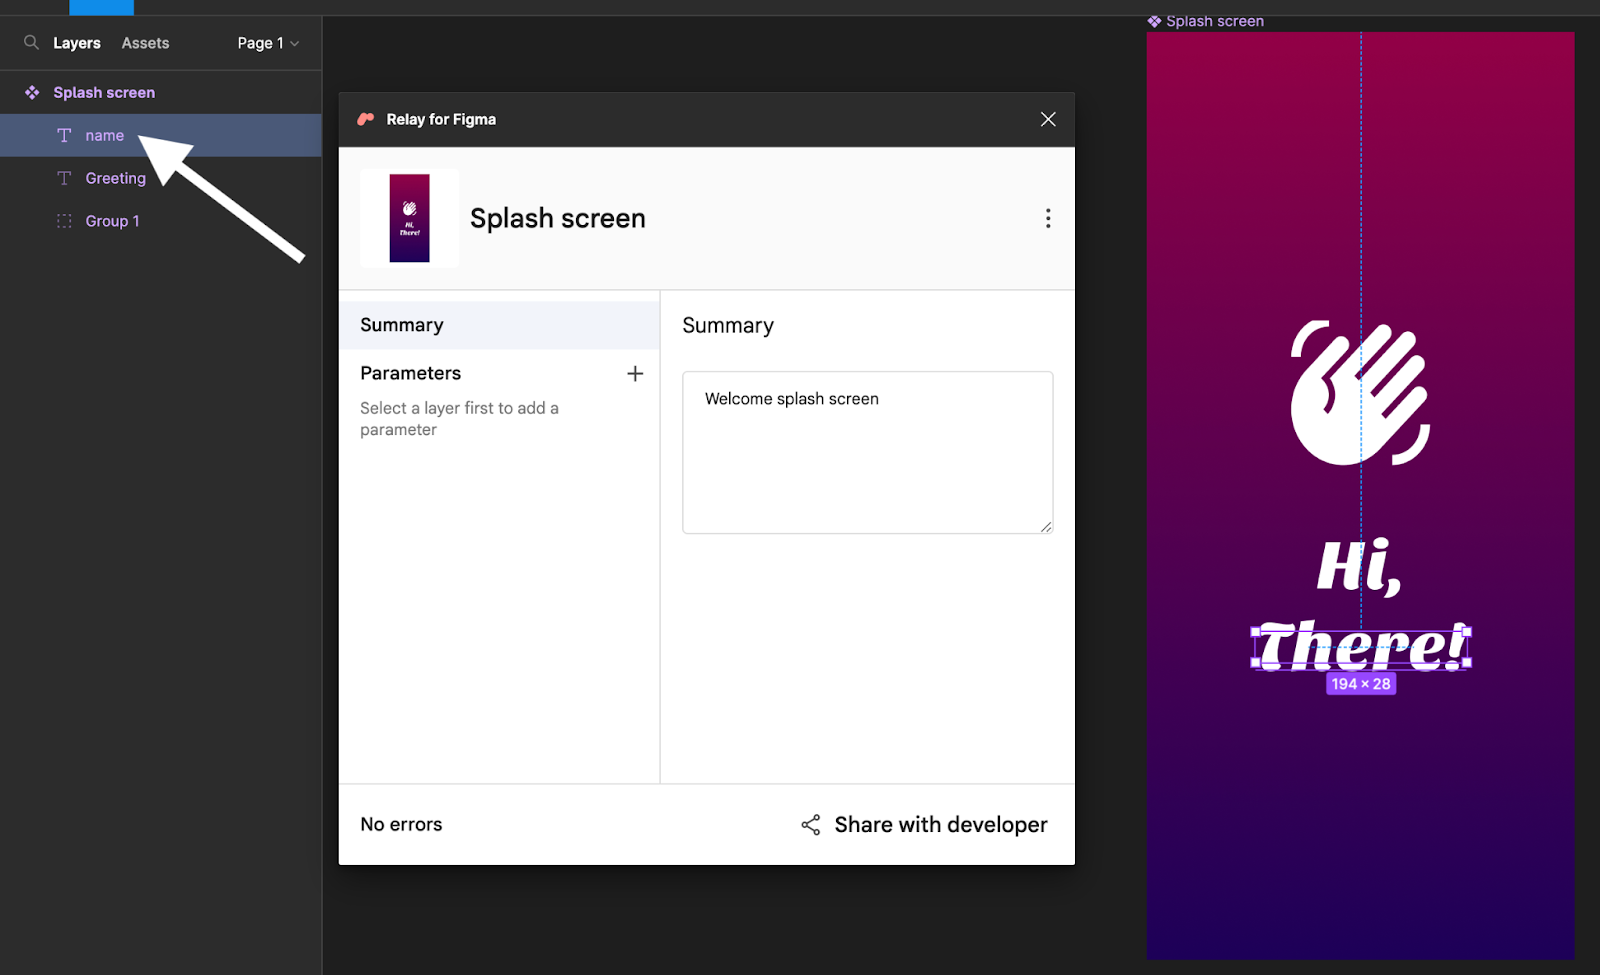
On the Relay for Figma window, click the “+” icon next to the Parameters section to add a parameter.
Select “text-content” as the parameter type.
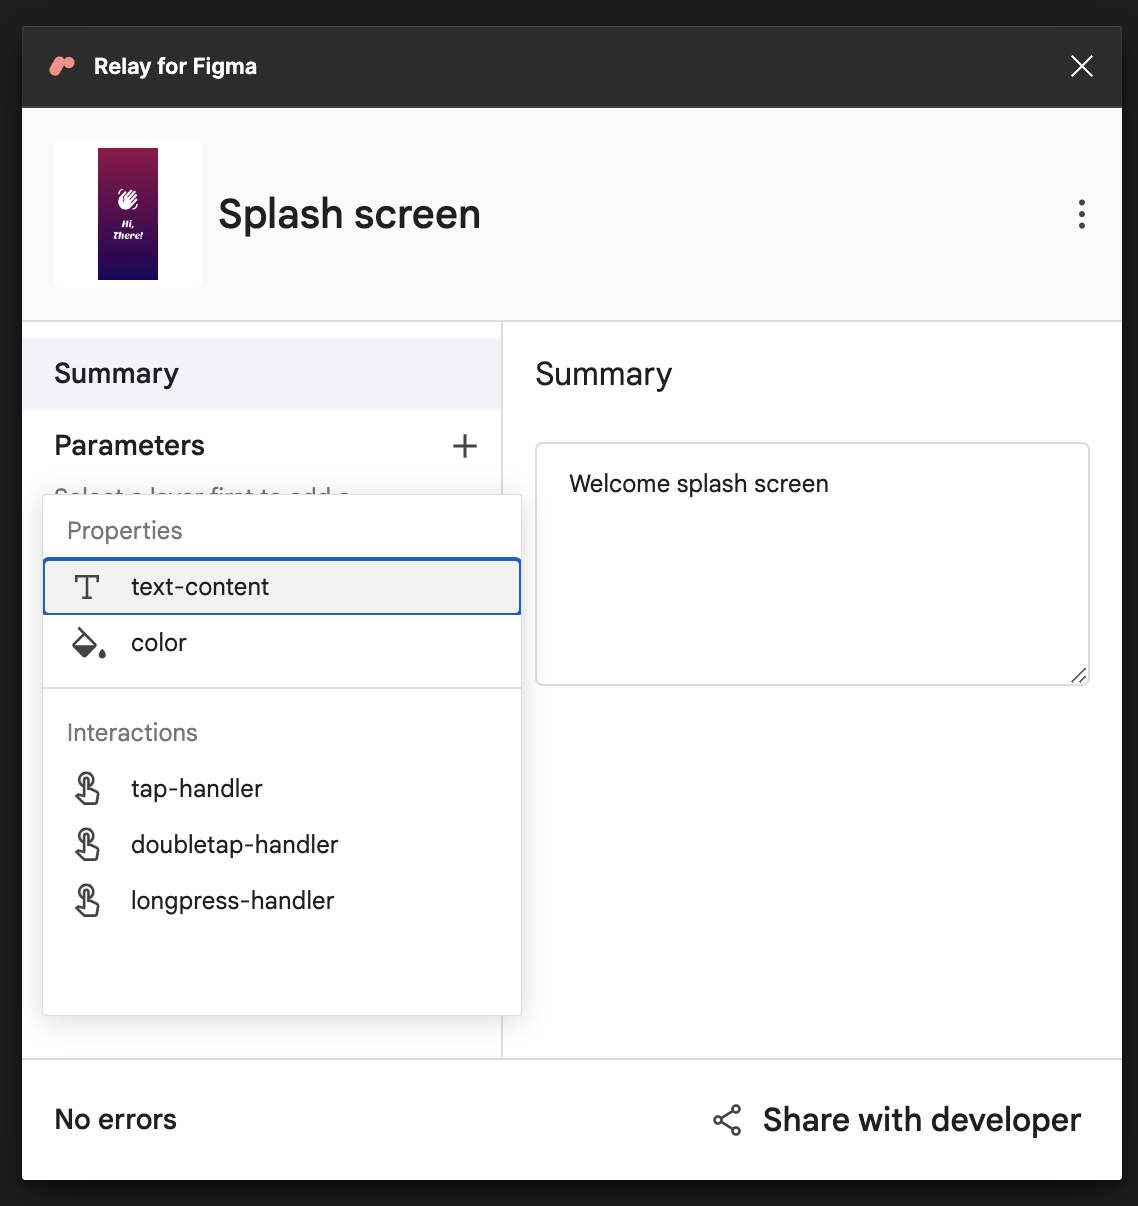
Enter the name of the content parameter into the Name input text field. This represents the name of the parameter in the generated composable function.
Enter a description that will generate a comment in your composable function to describe the parameter.
Click on "Share with developer".
In the Save version history section, enter a version name for the file and describe the changes made.
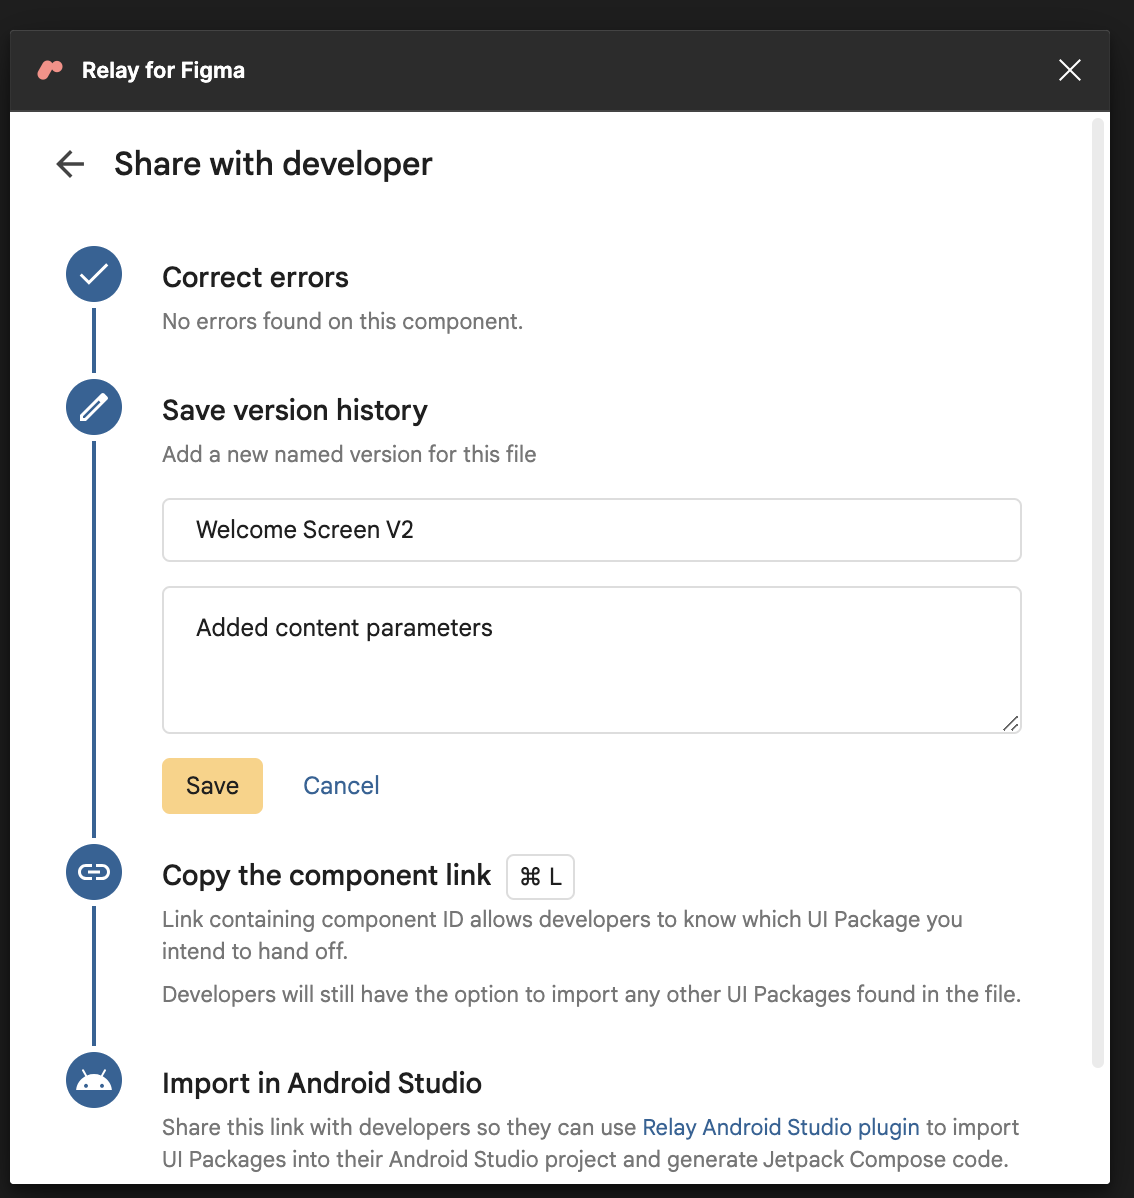
Click on "Save".
Copy the shareable component link by pressing
CMD+L(Mac) orCTRL+L(Windows) andCMD+C(Mac) orCTRL+C(Windows).
Update UI component in Android Studio
To update the UI component in Android Studio to reflect these changes:
In the
ui-packagesfolder, select the imported Figma package you want to update (e.g., thesplash_screenfolder).Right-click on the
splash_screenfolder and click on "Update UI Package".
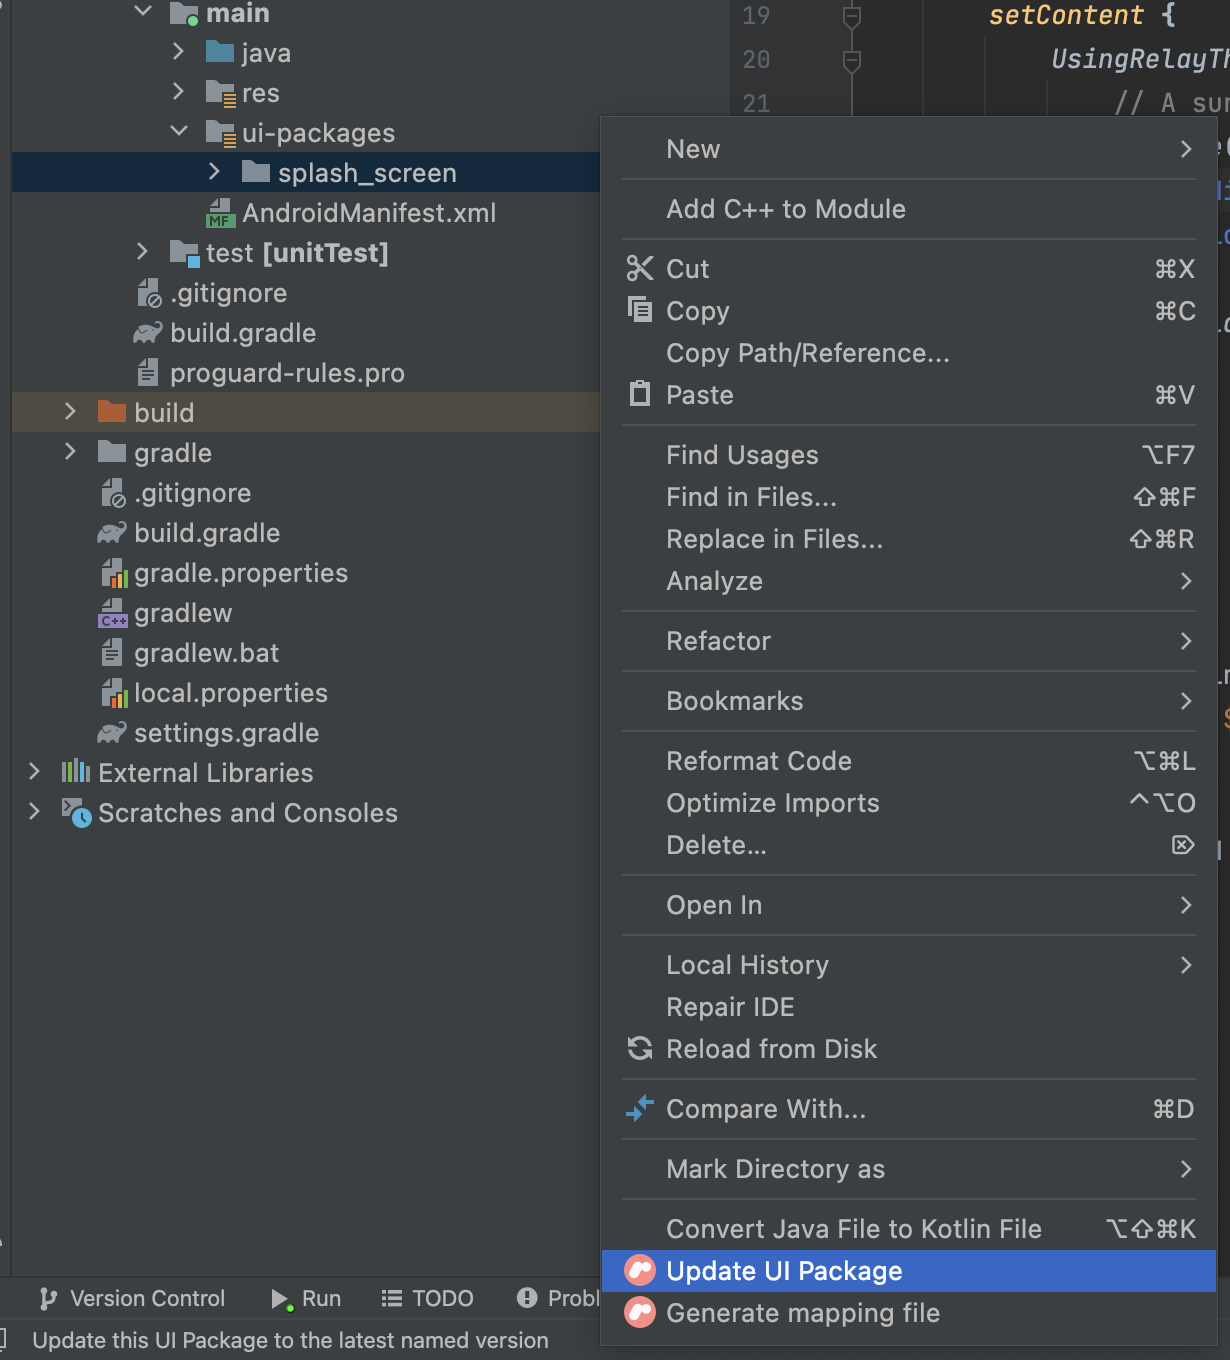
- After a successful download and import, click on “Make project” to rebuild your project and update the generated composable functions.
In the SplashScreen.kt file, you will notice that a parameter name of type String has been added to the SplashScreen() Composable as shown below:
@Composable
fun SplashScreen(
   modifier: Modifier = Modifier,
   name: String = ""
) {
   TopLevel(modifier = modifier) {...}
}
- In the
MainActivity, update the two places where you called theSplashScreenfunction by passing an argument for the parameter name as shown below:
In the MainActivity’s onCreate method:
class MainActivity : ComponentActivity() {
   override fun onCreate(savedInstanceState: Bundle?) {
       super.onCreate(savedInstanceState)
       setContent {
           UsingRelayTheme {
               // A surface container using the 'background' color from the theme
               Surface(
                   modifier = Modifier.fillMaxSize(),
                   color = MaterialTheme.colorScheme.background
               ) {
                   SplashScreen(name = "Love")
               }
           }
       }
   }
}
In the composables Preview:
@Preview(showBackground = true)
@Composable
fun DefaultPreview() {
   UsingRelayTheme {
       SplashScreen(name = "Love")
   }
}
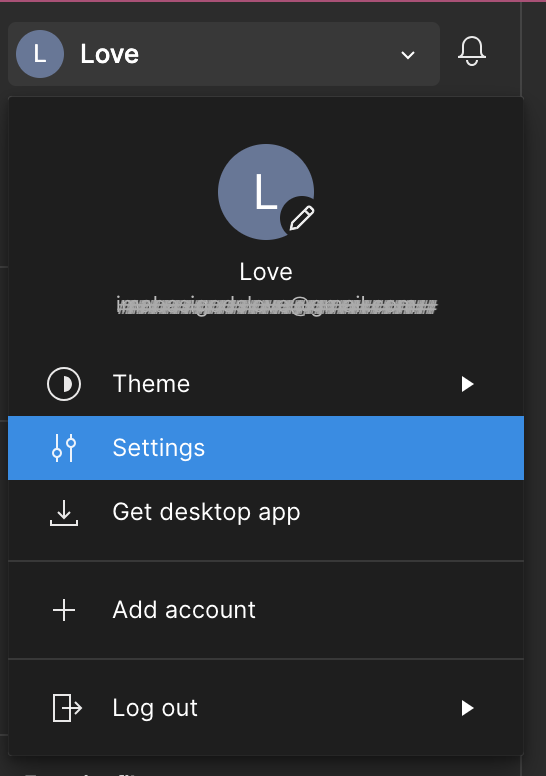
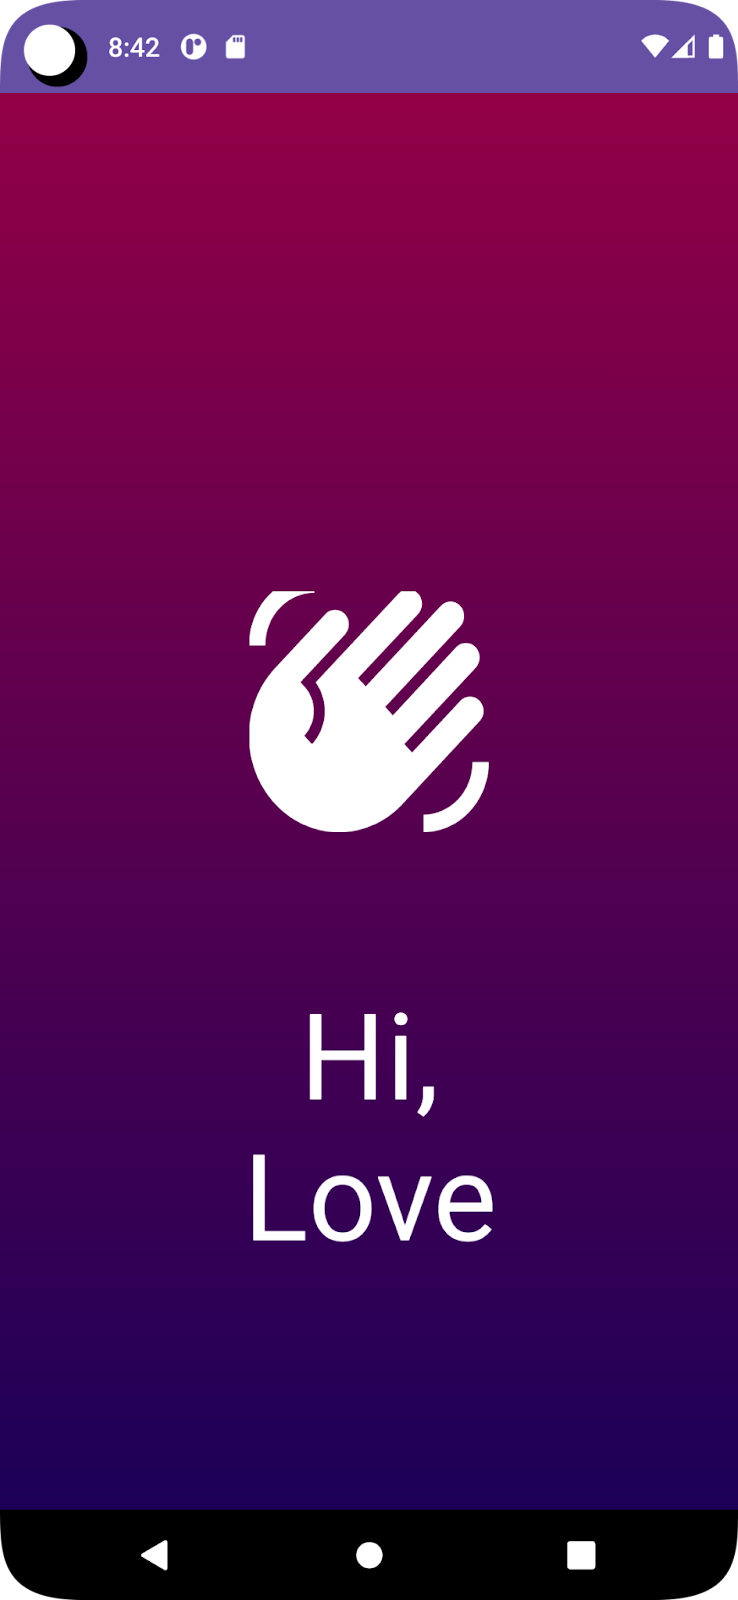
Running the application, you will see the splash screen displays the argument you passed into the composable:
Congratulations on following through this far!
Feel free to check out the official documentation and explore the possibilities with Relay!
Thank you!
You can explore different property types and play around with them.